Altered Book: Without the Heart, There Can be no Understanding Between the Hand and the Mind

Altered Book: Without the Heart, There Can be no Understanding Between the Hand and the Mind

Our move from the old apartment to the new one has been pretty time consuming over the last few weeks but as of today I am settling into my new studio space. I always find it hard to get back on track with creative projects after a move but I had to recover quickly this time because of an artist call deadline yesterday. There is a book show in the UK I wanted to take part in and it meant creating new work to fit the theme of their show and getting it done by Sunday evening.

Altered Book: Without the Heart, There Can be no Understanding Between the Hand and the Mind

This old book wasn’t great to work with because the spine was a bit broken and the pages are yellowed and brittle. I went with it anyway because it was the perfect size for what I wanted to do and don’t have a lot of other small books on hand at the moment. I ended up redoing a lot of work on this book, like folding and unfolding all of the pages because it didn’t work with what I wanted to do. I also had the whole thing complete with arms attached when I decided it needed “something more” and pulled it all apart again to add the cover image.

Altered Book: Without the Heart, There Can be no Understanding Between the Hand and the Mind - detail

At first I could not get my head around how to cut an arched niche into the open book pages because I usually do this when the book is closed and flat. It worked out rather well though and is just the right detail to house the apple. I chose to do this as a three dimensional standing piece to try something different. I also wanted the arms to be on the outside of the book and didn’t think their placement would work well in a hanging piece.

Altered Book: Without the Heart, There Can be no Understanding Between the Hand and the Mind - detail

The vine “tattoo” on the wooden arms was added by very carefully using a rubber stamp. It’s not easy trying to print a design on a rounded surface without mucking up the design, but I did it. The red thread was the final detail I added because I again felt it needed ‘something more” to tie the whole composition together.

Altered Book: Without the Heart, There Can be no Understanding Between the Hand and the Mind - detail

Materials used: book, inkjet print of photo, gel medium, plastic apple, wooden puppet arms, red thread, rubber stamp and ink, and pins.

Altered Book: Experimenting with Pull Tabs

I did a quick project yesterday to experiment with putting a pull tab mechanism, with object, into a book. I really like the results, though I’m not treating what I’ve made as a finished product. To give you an idea of what I’m talking about, think back to those childhood pop-ups books where you come across a tab at the side of a page. Pulling the tab would make something move within the book. Usually the whole mechanism is made with paper, but because I want to eventually make altered books with movable parts I probably can’t only work with paper.

Altered Book- Experimenting with pull tabs-4

Pictured above is the finished project I made the other day. Below is the simple inner workings of the pull mechanism using cardstock and part of a resistor. The pattern I learned from uses a washer/lever system that comes through a hole in the background paper to attach to whatever should be moving on the front. This method is better suited to moving something back and forth, but I wanted to move the butterflies up and down. I decided to make slits in the background paper for the wires to run along when the tab was pulled.

Altered Book- Experimenting with pull tabs-3

The tricky part was figuring out how to position the wires correctly through the background paper to match up with the butterflies, and then slip the resistors through the paper once they were glued.

Altered Book- Experimenting with pull tabs-3

The finished movement isn’t dramatic (pictured below) but I’m satisfied with having figured out a new approach I can apply to something else.

Altered Book- Experimenting with pull tabs

Here’s the top view of the project so you can see that I actually did all of this inside a real book.

Altered Book- Experimenting with pull tabs-2

Becoming a Paper Engineer

Last week I began exploring the idea of creating books with pop-ups and movable parts. I was inspired by an artist call for submissions and decided to use this as an excuse to push even further the creative possibilities of my altered books. My first step was to go to Chapters and start looking at pop-up books in the children’s section to get a feel for how these things are constructed. I was really blown away by some of the books I found. [1][2][3]

I ended up purchasing Paper Engineering and Pop-ups for Dummies because it seemed to be an excellent resource for the kind of information I was looking for. None of the sample projects involve incorporating the techniques into existing books but they will help develop my own ideas.

IMG_9876-Edit

IMG_9878-Edit

So far I’ve been experimenting using the projects in the book as a jumping off point, and I’m trying to focus on learning the technique rather than trying to produce a finished product. The above two photos are of two pop-up cards I created using cardstock. I came up with my own design rather than following the instructions because I really didn’t want to make a pop-up card with hearts. I kept things simple though and made sure not to worry about what I was making. It’s important to “let go” when experimenting.

IMG_9879-Edit

This airplane card is my first attempt at creating a pull mechanism, and again I was modifying the idea to suit my own purposes while learning the technique. It’s fascinating learning how to create a mechanism out of paper because it is way more complex on the inside than the simple movement of pulling the tab on the outside would imply.

IMG_9882-Edit

This 3-D paper pop-up of a lotus flower is a design I came across online as a video demonstration. It looks really beautiful and complicated, but it’s actually very simple and made from a single piece of paper.

Next up, exploring more techniques and translating what I learn into creating an altered book with found objects and moving parts.

Altered Book: King of the Beasts

Altered Book: King of the Beasts

I’ve had a love of lions since I was a kid because I was born under the astrological sign of Leo. I have also always wanted one as a pet because taking a lion for a walk would be so cool, at least until it decided to eat someone, or someone’s dog, or me. I have a whole list of inappropriate pets but for now I’m maintaining things at one small bird and two small fish. But I digress…

I think the significance of lions as my birth sign made it difficult to settle on just the right setting for this wooden lion in an altered book. I tried to make him a home in about three or four of the previous books but nothing felt right. I ended up doing a bit of internet research on lions to help inspire me but the reality of the situation for these creatures in the wild is quite depressing. They once ranged all over parts of Europe, Asia, India and all of Africa and now have mostly been wiped out in the wild.

Altered Book: King of the Beasts

More of my research led me to the rich symbolism of lions. They are often called “King of the Jungle”, but this is a misnomer since they don’t live in jungles at all but prefer to dwell in savannah grasslands and semi-arid plains. In ancient cultures the lion is considered a solar animal symbol (Leo is a sun sign) but lions are actually nocturnal. I took all of these bits of information and tried to incorporate them into the imagery of the book.
Altered Book: King of the Beasts

The rolled pages with brown leaves stamped on them became the grassy plains and also reference the jungle, while the stylized wood pieces (from a musical instrument) are the palace of the king of beasts. The two tarot cards were a lucky find so that I could include both the sun and the moon in the book. The crown on the lion’s head was the finishing touch that I added as an afterthought but it gives it the right bit of whimsy and ties things together.

Altered Book: King of the Beasts

Altered Book: King of the Beasts

Materials used: book, tarot cards, wooden toy lion, wooden musical instrument parts, Japanese paper, rubber stamp and ink, and gel medium.

Altered Book: Living Well, Sip by Sip

Altered Book: Living Well, Sip by Sip

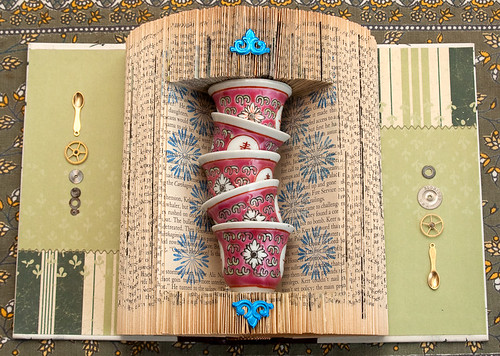
First off the basic idea of this book, the style of folding the pages, was completely inspired by a wonderful altered book by Sharon McCartney. I liked the shape created by folding the pages in half lengthwise and tucking each one into the book. I also loved the idea of creating a niche within folded pages to contain an object instead of ones glued together flat as I’ve done in the past.

Altered Book: Living Well, Sip by Sip

This work started out as a home for a wooden lion, and then was briefly destined to be a home for a wooden kangaroo. Neither seemed quite right so I brought out the stack of teacups to play with. These little teacups have been waiting in the wings for awhile to make their way into a book. I wanted them to be stacked irregularly, and with this book I managed to pull it off. Only the cups at the top and the bottom of the stack are attached to the book, the rest float freely and can twirl and twist in place. (See the video at the bottom of this blog post for a demo.)

Altered Book: Living Well, Sip by Sip

Altered Book: Living Well, Sip by Sip

I was thinking about the idea of “tea time” as I worked on this, so I chose a few small gears from my collection of watch parts to decorate the end pages along the side. There are also two small spoons to tie into the tea theme. I bought these from RubyDog’s Art House as part of a tiny cutlery set, and the spoons are my favorite.

Altered Book: Living Well, Sip by Sip

To demonstrate the moving part in this altered book I shot this quick video using my laptop’s built in camera. You’ll need to turn the sound up on your computer because it’s a bit quiet.

Materials used: book, card stock, watch gears, metal spoon, ceramic teacups, rubber stamp & ink, metallic paper decorations, and gel medium.

Altered Books for Sale on Etsy

Yes, it’s true. There are altered books listed for sale on Etsy. Please do check them out in my shop and share them with your friends. An independent artist is only as successful as the audience who is willing to support and share their work.

Since the altered books have returned home from the show at Art Space Vancouver, I’d been going back and forth about whether or not to list this work on Etsy. I was questioning if there is an audience for them there, whether a craft-focused site was the right fit for this type of work, and had my doubts about people purchasing work from Etsy that is of a higher price point. But it makes sense to have them there because I need to let people know they are for sale and it’s the simplest tool in which to do this. I’ve sold six of these books but I need to reach a wider audience of buyers.

I decided to rephotograph each book for listing on Etsy, to show different angles and how they look framed. I used studio lights instead of the on-camera flash I typically use when I document work for posting to Flickr and my blog. I realized as I did all this how amazingly simple the whole process of documenting artwork has become thanks to digital photography. I had the first few books on Etsy in a matter of hours, which is pretty damn awesome.

I’ve been extremely well organized about documenting the altered book work as I go along, and as I was creating the listings on Etsy I realized how valuable this is to treating my art as a business. I photograph and blog about them as soon as one is finished, and I also track them in an inventory spreadsheet in Google docs. Having so much information already on hand and online made it incredibly easy to put together the listing description and (voilà!) have new work listed for sale in an efficient fashion. It really pays off to be an organized artist, which is something that has taken me a really long time to learn.

As a side note, I’ve just started sending out a monthly newsletter with updates about upcoming exhibitions (my own and others) and new work. You can subscribe here, and I promise to keep things fun.

Altered Book: The Loved Birds

Altered Book

This is the second of the blank books I am working with to create a series using imagery of trees and birds. I don’t think this one is as successful as the first book and the more I look at the finished product the less I like it. The different elements don’t quite come together and the branches look like antenna sticking out of the top of the book. I think I will work on this one a bit more…

Altered Book-5

The cover image is another of my black & white tree photos taken with a Holga camera. I wanted to have the doorway cut directly into the trunk of the tree to create a sense of shelter for the nest inside. The two yellow feathers are from Yuuki the lovebird and the blue stone is actually a heart-shaped piece of beach glass I found on Bowen last year. The nest came fully formed from Michael’s craft store, where I went a few weeks ago looking for supplies.

Altered Book-2

After gluing the pages together with gel medium I used a drill through the top of the book to create holes for inserting the branches. It worked better to start with a small drill bit and slowly make the hole larger rather than starting with the correct size. The paper didn’t have much resistance against the larger drill bit and I had to be careful not to destroy the book in the process.

Altered Book-3

I really like adding a little “something” to the sides of the book as a finishing touch to break up the white space, and have used rubber stamps on the last two books.

Altered Book-4

Materials used: blank book, ink jet print of holga photo, gel medium, tree branches, lovebird tail feathers, nest, beach glass, acrylic paint, rubber stamp and ink, decorative paper, and door transparency.

Altered Book: The Littlest Birds

Altered Book- Little birds

A few months ago my friend Siobhan gave me eleven blank books to work with and turn into altered books. I’ve been pondering what to do with them and finally decided to take the plunge and actually explore ideas instead of just thinking about them. Each book is about an inch and a half thick with a plain white cover and pages, and began life as a stand-in dummy for Harry Potter books. I’ve never had so many of the same kind of book at my disposal so I’m hoping to use their uniformity to turn them into a series.

Altered Book: The Littlest Birds - detail

Because these books have spines that are glued together to attach the pages it limits what I can do because they aren’t as flexible as a stitched binding. I decided to cut through the cover and create a niche inside the pages and used the shape of the door frame as my guide. When I started cutting I wasn’t sure what I would be putting into the book but I wanted to do something with birds. I cut about half way through the book then glued and painted the pages together. The three birds were chosen, cut out and inserted between the pages with two layers of different tissue paper as a background inside the niche.

Altered Book: The Littlest Birds - detail

The image covering the outside of the book is a black & white double-exposure photograph taken with my Holga a few years ago. At first I attempted a gel medium transfer of this on the cover using an inkjet print, but the paper on paper transfer didn’t work so well. I settled on attaching the print itself to the cover and coating it with gel medium to create texture and a protective coating. The door frame is a transparency and I painted the back side of it white so it would stand out more strongly from the background of the tree branches.

Altered Book: The Littlest Birds - detail

As I was about to attach the branch along the left side of the cover I decided to add three leaf-shaped glass beads to give it a bit of colour. The leaf pattern along the sides of the book were added using a rubber stamp and ink and also add life to an otherwise blank space.

Altered Book: The Littlest Birds - detail

Materials used: blank book, print of double-exposed holga photo, paper birds, blue tissue paper, acrylic paint, rubber stamp and ink, gel medium, driftwood branch, and three leaf-shaped beads.

Altered Book: Buttons Fasten and Threads Tie

Altered Book: Buttons and the Red Threads

I love buttons and have a small collection I’ve been holding onto for a long time. Some of these are ones purchased in Toronto years ago, while others come from Dressew and Button Button. A small number were scavenged from my mom’s giant tin of buttons, and a collection of sewing fixings given to me by Boris’ mom Anne.

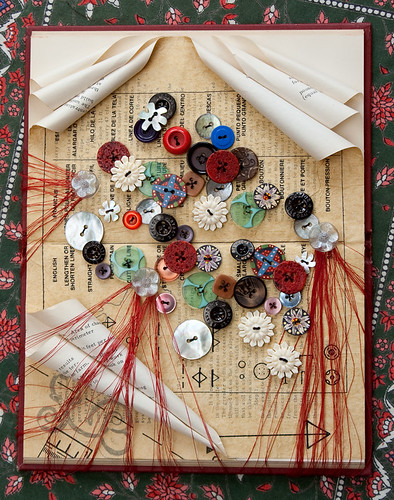
When I was trying to brainstorm a new altered book I pulled out the buttons, along with other materials, and played around with them as I decided on what I wanted to do. I settled on the buttons because the colours and textures appealed to me and I also thought I’d finally tackle some experimenting with sewing on paper.

Altered Book- Buttons-5

The irony of choosing so many buttons to work with in this book is that I hate sewing buttons. It’s one of those small tasks I tend to procrastinate, and it takes me FOREVER to get around to reattaching one when a button has fallen off my clothes

Altered Book- Buttons-4

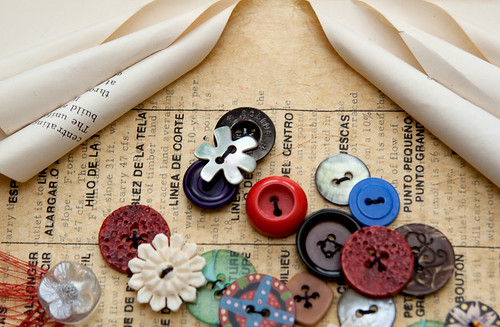
Sewing through the pages working well even though the paper was old and brittle and not as forgiving as fabric. I think layering sewing pattern paper on top of the page helped to reinforce it slightly. The piece of paper I chose happened to explain different symbols found in sewing patterns including that of buttons and other fasteners. I added the red threads as a finishing touch, winding them around the three flower buttons and attaching them to the back of the book.

Altered Book- Buttons-3

Altered Book- Buttons-2

Material used: book, sewing pattern paper, red cotton thread, fifty buttons made with a variety of materials, glue, and gel medium.

Altered Book: The Butterfly Garden

Altered Book: The Butterfly Garden

This is one of those pieces where I began without a plan and just followed wherever the book wanted to go. I wanted to create another folded page book using the same fold pattern as I did in a previous work but I had no idea where I would go from there. I tend to select objects and materials to inspire the direction of the work, but this time I didn’t do that.

Altered Book: The Butterfly Garden - detail

Altered Book: The Butterfly Garden - detail

This is a book of four hundred and thirty pages which means I folded about two hundred pieces of paper. When I finished folding I played around with the paper further and eventually decided to roll the pages underneath one another. I added colour and pattern using a rubber stamp, first in yellow and then in green. I actually had the whole thing close to completion when I decided the yellow wasn’t strong enough colour over the text. I had to go back, unroll all the pages, rubber stamp them, and then roll them again. The butterflies were the final element and their bright colours are the perfect compliment to the crazy folded background.

Altered Book: The Butterfly Garden - detail

Altered Book: The Butterfly Garden - detail

Materials used: book, rubber stamp and ink, paper butterflies, and lots of glue.