Experiments with Scribbles

I’ve wanted to explore looser, less defined shapes with my work after a recent conversation with an art consultant. It got me thinking about making cut paper designs based on scribbles. I started with a few scribbled drawings in a sketchbook to get the idea down on paper. I wanted to see if I could consciously doodle lines in a random way that could be interpreted in cut paper.

Scribble

Scribble

I quickly moved on to making a prototype by drawing looping lines and figuring out the best way to approach cutting it out. It felt like I needed to rethink how I did things because it’s a series of intersecting lines, and I have to plan ahead carefully on how and where to place cuts in relation to others.

Scribble

Scribble

I made this test piece from Japanese Gampi paper I bought in Toronto last year. I want to incorporate more diverse types of paper into my work than I’ve used in the past. This material cuts beautifully and is much sturdier than I’d realized.

Scribbles

The finished piece is different from my usual hand cut designs, at least at this first pass. I am excited by this idea and can’t wait to explore things further.

28 Days of Hearts in February

To get myself back on track after the displacement from my studio last month, I decided to work on a daily project in February. I was feeling both drained and depressed, and decided what I needed was a little more love. So I went wth the plan to create one heart a day for the month of February.

I alternate each day between drawing with gel pens, and cutting the designs by hand while coming up with something new to do within the same heart shape every day. I have been enjoying the heck out of this project. It has lifted my spirits and fuelled my creativity in a HUGE way. I reached the half-way point of the project on Valentine’s Day this week, and so here are the first fourteen hearts I’ve made so far.

28 days of hearts
Day 1

28 days of hearts
Day 2

28 days of hearts
Day 3

28 days of hearts
Day 4

28 days of hearts
Day 5

28 days of hearts
Day 6

28 days of hearts
Day 7

28 days of hearts
Day 8

28 days of hearts
Day 9

28 days of hearts
Day 10

28 days of hearts
Day 11

28 days of hearts
Day 12

28 days of hearts
Day 13

28 days of hearts
Day 14

I hope you had a happy love day!

Upcoming Altered Book Workshop with the CBBAG

On March 3rd I will be teaching an altered book workshop in partnership with the Canadian Bookbinders and Book Artists Guild (CBBAG) at Creekside Community Centre. This is a rare opportunity to take this type of workshop with me as I haven’t offered one in over three years. Space is limited so book your spot now!

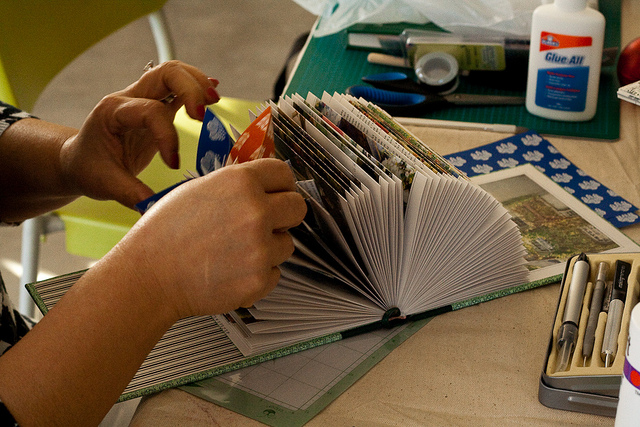
The workshop is an introduction to examples and techniques for transforming old books into one-of-a-kind pieces of art. There is an unlimited potential for creating interesting work by altering books through cutting, folding, rolling, collage, etc. This class will demonstrate a selection of techniques and provide a starting point for creating work of your own.

Registration is through the CBBAG, with more details here »

Date: March 3, 2018
Time: 10am to 3pm
Location: Creekside Community Centre, 1 Athletes Way
Cost: $80 CBBAG Members, $100 Non-members

Lucky Red Envelopes

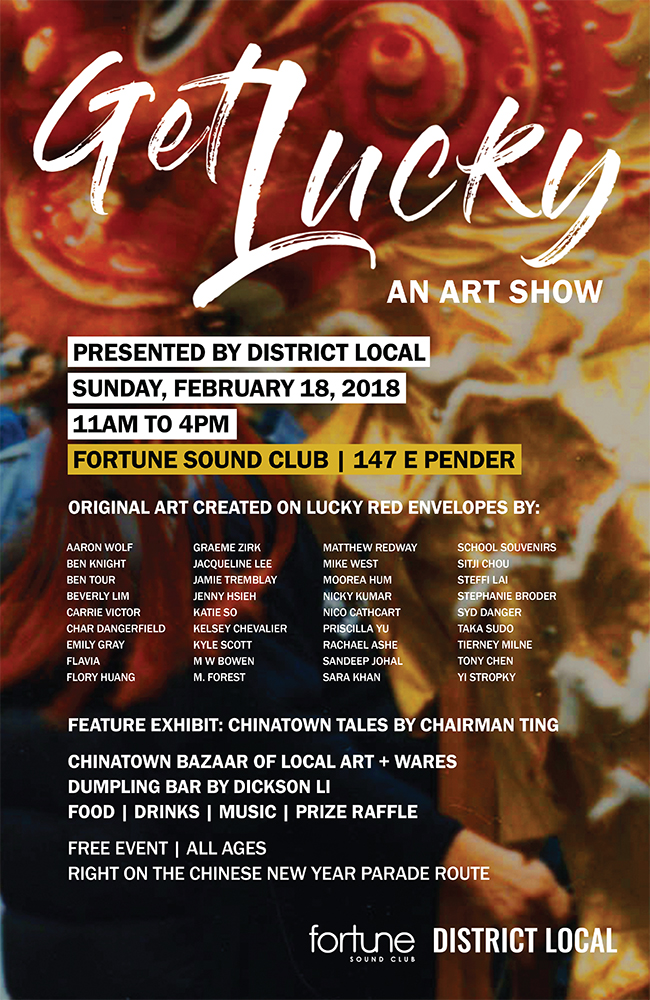
I am excited to be part of the Get Lucky group show, organized by District Local, and happening for one day only on February 18th. The participating artists were each given a bunch of red envelopes to create work for the show, and how they were used was left up to us. The envelopes are traditionally given out at special events such as Chinese New Year to symbolise luck.

Untitled

Untitled

I decided to make two paper cut pieces from the material, with my usual intricate designs. I carefully opened up the sealed sides and bottom of the envelope before doing the cutting, and then reassembled it with re-enforcing card stock while leaving a quarter inch of space between the cut surface and the inside. I wanted them to be tiny shadowboxes with shadows cast on the inside. Each one is 3.5″ x 6.5″ and very delicate.

Untitled

Untitled

Untitled

Come see these in person, along with the work of an impressive list of artists. Read more about Get Lucky on the District Local website.

Date: Sunday, February 18, 2018
Time: 11am – 4pm
Location: Fortune Sound, 147 E Pender Street
(On the Chinese New Year parade route!)

When Water Rushes In And Life Tilts Sideways

Three weeks ago on a Monday morning, just like this one, I was working from home on my computer. I had just put the finishing touches on a blog post when I started to hear the sound of water running, but in a way that seemed out of the ordinary. I got up from my desk to take a look and saw water coming from the ceiling in the front hallway of our apartment. I ran to the second floor to see what was going on and found my upstairs neighbour with water all over the floor of her place. All caused by a repair gone wrong thanks to our incompetent building maintenance guy.

By the time I ran back to our apartment water was pouring down from the ceiling. I rushed around grabbing buckets to catch the flood, build a dam of towels to block the flow to the rest of the rooms, and hurriedly moved furniture and objects out of the way. There was so much water that I had to empty the heavy buckets into the bath tub multiple times. Water eventually came down in the bathroom, living room and my studio, but I managed to move everything out of harm’s way and nothing was damaged. Thank goodness it was a day I worked from home because otherwise everything would have been ruined.

It was an extremely stressful and panic-filled morning that left me in complete shock, and exhaustion from the huge surge of adrenaline. I was feeling completely alone and overwhelmed, so I posted to FB about what had happened. A few friends reached out and came to lend a hand in moving stuff out of way and provide me with some much-needed emotional support as I dealt with the aftermath.

We’ve been displaced from our home since that fateful Monday as remediation began the same day, and the drying effect made the place uninhabitable. We stayed in a hotel the first night, a friend’s place in Kits the second night, and another friend’s place in Gastown for a few weeks while they are (lucky for us) out of town. Over the past few weeks we’ve had to scramble to find an affordable furnished place to live for a few months, get a storage unit to store most of our stuff, find a moving company on short notice, and then pack and move out of our entire apartment within three days. We also had to do a second small move from Gastown to Yaletown, which turned out to be more stressful than moving out of our apartment.

I’ve had to take time off of my part-time job to deal with everything and also recover from the physical and mental exhaustion. Thank goodness for an understanding employer! Without a studio I no longer have a dedicated space to work on my art, and have had to set aside all the big plans I had for experimenting with block printing, and making large paper cut work. I’m struggling to make a new plan for things to work on and stay motivated over the upcoming months. But I need to make art, no matter what happens, because the process of creation has always been the thing that is key to my happiness.

While we’re not homeless, we are displaced from everything that was familiar and I’ve been struggling to get my head around this sudden unwanted shift. I am borderline depressed and working hard not to fall into a deep dark hole. I think I have cried every single day since the flood, and continue to be completely depleted physically, emotionally, and spiritually. The hardest part has been to listen to thoughtless people say meaningless platitudes or completely stupid things to me about my situation, and have people who I thought were good friends not even get in touch to see how we are doing.

I’ll end this blog post on a positive note by saying there are things I am grateful for in this situation (most of which I won’t get into here). I needed this shift in perspective about my life in Vancouver, and I now get to experience living in a different part of the city for a short while. I had been feeling like I needed to shake things up, so I was practically asking for a dramatic change. I just wish it could have happened in a less challenging and stressful way. I think the Universe doesn’t always give you what you want, but she does give you what you probably need. It’s far too soon to feel reflective about this whole situation, but give me some time and I will get there.

Get Lucky Art Show 2018

My first show of 2018 will be a group art show titled, Get Lucky, hosted by District Local.

In celebration of Chinese New Year and the Year of the Dog 2018, we’re bringing back Get Lucky, a free one-day art show, for a second year. Vancouver artists have created artwork on red pocket/lucky envelopes – trust us, these pieces will blow you away. The show is timed with the annual Chinese New Year Parade – and it’s right on the parade route. Come get a full dose of new year fun and support the incredibly creative culture we have in Vancouver.

Read the full list of artists here.

Date: Sunday, February 18, 2018
Time: 11am – 4pm
Location: Fortune Sound, 147 E Pender Street
(On the Chinese New Year parade route!)

Experiments with Block Printing Layers

I’ve continued with my experiments in learning how to carve and print rubber blocks. Last week I carved two more and used them to test out a few new inks purchased after my initial work in the studio, along with a metal inking plate. What a difference it makes to use it, and have more colours to experiment with. Everything included in this blog post is rough beginners work that isn’t very good, but it’s helping me figure out how to use the tools.

Work in progress: block printing experiments

Work in progress: block printing experiments

I added a bit more detail to the pattern I carved last week and used it to test out layers of pattern in different coloured inks. I love the metallics, though I’m not sure how much I will use it in my work.

Work in progress: block printing experiments

This test print is from a quick stamp I carved from a scrap piece of rubber and used it to exploring mirroring and repeating a single element. I put too much ink on sometimes, but the more I work at this the better I get a sense of how much ink is enough.

Work in progress: block printing experiments

Work in progress: block printing experiments

Work in progress: block printing experiments

I did a few quick test paper cut designs from the paper I printed because this is where all this experimenting is heading eventually. Printed colour and pattern over a cut design.

Work in progress: block printing experiments

Work in progress: block printing experiments

I have two test prints waiting to be cut this week in the studio. I can’t wait to work with them, and also create more block prints to experiment with.

A Container for Collecting Good Things

Inspired by The Happiness Jar shared by Elizabeth Gilbert, I decided to make my own to put into practice this year. This is something I’ve wanted to do in previous years but because I missed starting on New Year’s Day I’d put it off for another time. This year I wasn’t going to miss out, and luckily I had the perfect container to use for the project leftover from Christmas present season.

Untitled

My container is a metal tin from Muji that I have covered in layers of washi tape (which I have a lot of), and then cut a slit into the top for inserting pieces of paper. I also sectioned pieces of colourful origami paper into four to use for writing down good things. The Good Things container sits in our dinning room for easy access. I’m trying to add things often but not daily.

Untitled

The idea of this activity is to collect things you are happy about throughout the year, write them down when they happen, and collect them in a container to read at the end of the year. This can be done as frequently as daily, or as often as weekly. Whatever works for you.

Untitled

Read more about The Happiness Jar on Elizabeth Gilbert’s site, and maybe make your own. You don’t have to wait for a specific perfect time. Just do it now!

Experiments with Block Printing

I’ve been slowly working out how to tackle the idea of creating custom printed paper to use in my cut paper work going forward. I don’t have the facilities available in my home studio to do screen printing because it’s messy, needs space to print and dry, and plenty of water to wash screens. I’ve considered having paper printed for me based on my designs, but I’m such a hands-on person I really want to do this myself. Looking into other printing methods has led me to explore block printing, and this week I carved and printed my first block.

I bought a starter kit from Opus just before the holidays to get me started. It contains the basics tools of a lino cutting tool with three blades, a tube of ink, one soft rubber block, and a small brayer.

Untitled

I drew a relatively simple design directly on the block using pencil rather transferring from a sketch, and started carving. As I worked I realized my design could have been even simpler for my first try because there were some small details that were challenging to work around, and way too many curves. The process is similar enough to carving paper with a knife that it didn’t take long to get the hang of it. I made use of all three sizes of blades as I worked.

Untitled

I used the finished block to print white ink (from an ink pad) onto a piece of black card stock. I did an initial printing to check the design and then re-carved a few spots that needed fixing. I think next time I need to carve more deeply.

Untitled

Untitled

I finished my little experiment by doing a quick paper cut from the printed material to see how the different colours would interact with the design. It was only then I thought about my choice to work in black and white when the main purpose of printing is to bring more colour into my work. Ha!

Sashiko Stitching On A Thrifted Shirt

I began this new year by getting started with another clothing embellishment project using sashiko stitching. I thrifted a button-up indigo denim shirt in the spring of last year with the idea I would decorate it somehow. I only recently came up with an idea for a design I felt suited the style of shirt, and once again it is inspired by layers of lines similar to the Seigaiha pattern, but without regular repeats. I’m freeform stitching the design and want the shapes to be organic and unique from one another.

Sashiko on a thrifted shirt

Sashiko on a thrifted shirt

I started on the front of the shirt and want to make the two sides balanced but not matching (because that would require more perfection than I am capable of…), and then add more of the design to the back. It’s been awhile since I’ve done much stitching, so starting off felt very clumsy and slow. I managed to finish most of the first side, and may tweak it a bit after I work on the second side.

Sashiko on a thrifted shirt

I love these projects to customize thrifted clothing, and wish I could come up with ideas more often along with the time to work on them.