Drafting a Tree Made of Knowledge

I decided to take part of last week off because even though there was a tonne of work I needed to do I was feeling far too depleted and brain dead to accomplish anything. I needed to brainstorm new ideas for an upcoming project but since nothing was coming I realized I needed a break. The PNE show took up a lot of my time in a way I hadn’t expected and it was a drain on creative energy after awhile. Towards the end of last week I could tell I made the right decision about taking a step back because the creativity and ideas started to flow again. Phew.

I need to create new work in time for the Culture Crawl in November, but first I need to put something together and write a proposal to submit at the end of next week. I won’t say much about what this one is all about because it’s in early stages. It’s an open-ended opportunity and I’m using it as an excuse to work collaboratively with friends and to create a large installation piece. The paper tree pictured here is a prototype for part of what I’m hoping to do on a much larger scale.

Drafting a Tree Made of Knowledge

I’ve had the idea rolling around in my head for awhile about making a tree, and there are many different ways I could do it (and still can). I wanted to tie it into the altered book work I create and even contemplated making a tree out of books. Making the prototype helped to formalize my ideas and now I have a clear idea how to proceed with the larger version.

Tree of Knowledge - details-2

Tree of Knowledge - details

It’s a bit rough around the edges but I didn’t want to be too precious with it because it’s meant to be a first draft. My biggest frustration while working on this were my limited drawing skills, but they’re good enough to make the outline of a tree.

I’m hoping the final version will be magical enough to fill the view with wonder and awe. That’s not a lot to ask of my work, is it…?

Altered Book: Circle Away and Return

This is a very photo heavy blog entry because I wanted to document the process of making one of my altered books. I chose this one specifically because it is my first book with movable parts. It was a very involved process and I had a lot of figuring out to do as I went along, but I loved every minute of making it. The idea of making a book with movable parts was motivated by an artist call put out by 23 Sandy Gallery in Portland, which I intend to enter.

The whole process started with selecting the right book for the project, one that was not too thick or heavy, and then I pulled out bits of ephemera to select the visual aspects of the book. I narrowed things down to a set of colourful pasteboard butterflies and started brainstorming ways of how I’d like them to move within the book. I decided the best way to proceed was to make a paper mechanism based on the designs in my book Paper Engineering & Pop-ups for Dummies. Most of the designs were vertical and I needed something to work horizontally, so it meant making a prototype in order to figure out how to make it work for me. Learning by doing is often the only way I can figure things out for myself.

Altered book - movable parts book-2

Pictured here are the pieces of the prototype mechanism I made from cardstock. The next step was figuring out where I wanted to place these in the book and how I could adapt it to my needs.

Altered book - movable parts book

I decided to incorporate two working mechanisms into the design and cut two niches into the book in the lower right and upper left, leaving a layer of pages on either side to hide the mechanisms.

Altered book - movable parts book-3

I made two new mechanisms based on my original prototype but smaller so they would fit within the height of the stacked book pages. I needed to leave a bit of space underneath so the paper rod in the middle had room to move freely without catching on the bottom of the niche.

Altered book - movable parts book-4

I padded the bottom and top edge of the niche with pieces of paper cut from the book itself.

Altered book - movable parts book-5

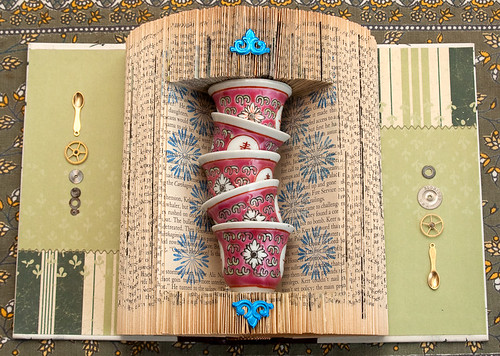
(I skipped photographing a few steps here). Pictured below is what the book looked like after all of my work with the mechanisms was complete. They were tucked away in working order within the book pages with the middle rod poking through a hole through the top layer of pages. I chose two brass watch parts as the turning knobs. At this point I started figuring out the composition of the book and realized I needed to reconsider the red gears as the platform for the butterflies.

Altered book - movable parts book-6

I chose sewing pattern paper as the first layer on the background because I love the yellow brown colour and warmth of the paper. I knew I would add something more to it as I went along but wasn’t quite sure what that would be.

Altered book - movable parts book-7

At this point I had also decided to make leaves for the butterflies to sit upon, and these would be the pieces that turned. I made the leaves from green paper with magnolia leaf skeletons layered on top to make them look more real. This is my favorite detail of the whole artwork, and I kind of wish I hadn’t hidden so much of them under the butterflies when I attached them.

Altered book - movable parts book-8

The final touches on the book was to add a few more decorative elements to the pages using scraps of Japanese paper and printing a leaf design with a rubber stamp.

Altered book - movable parts book-2

There are eight butterflies all over the book, with five attached to the movable leaves and three in stationary positions on the background pages.

Altered book - movable parts book-6

After all the work I did on this the actual movement within the book is very simple, it allows one to turn the butterfly leaves in a circle. I kept it simple on purpose because this is my very first movable parts book and there is plenty of room to be more ambitious with future projects.

Altered book - movable parts book-3

Altered book - movable parts book-5

Altered book - movable parts book-4

The finished altered book is lovely to look at and fun to play with. Whether or not this work gets accepted into the juried show at 23 Sandy, it provided me with the opportunity to experiment in new ways and create work I may not have otherwise made.

Altered book - movable parts book

Materials used: book, sewing pattern paper, Japanese paper, rubber stamp & ink, pasteboard butterflies, card stock, brass watch parts, leaf skeletons, lots of gel medium, and lots of glue.

Altered Book: Forgotten Knowledge

For the past two weeks I’ve been working on a proposal to do a large scale project of altered books. I’ve never done something like this before so it’s been quite a challenge to figure out the best way to approach working with multiple books in a series. Normally I make my altered books as one-of-a-kind pieces and can spend as much as ten hours on each one. For this project I’ve had to simplify how I work with them, come up with a common theme, and develop a process I can apply to making each one.

Altered book - Forgotten Knowledge

My plan is to take twenty-five volumes of a set of Funk & Wagnalls encyclopedias and insert natural objects into a niche custom cut from the pages of each book. The book pictured here is the second one I’ve completed, and as you can see the shape I had to cut was fairly complicated. The objects I chose to work with in this piece are two seal vertebrae scavenged for me from Pebbly Beach, Bowen Island, by Anne. The bones are very beautiful and I like their odd shapes protruding from the pages like two gargoyle faces.

Altered book - Forgotten Knowledge-2

I was over on Bowen last weekend and spent most of a walk along the beach and forest collecting things to use for this project. I was a little worried I wouldn’t be able to come up with twenty-five different items but I came home with piles of stuff to work with.

Collecting materials - Assorted

Pictured here are crab bits, drift wood, oyster mushrooms, a pine cone, lichen, seaweed, and bones from a deer. (I had to scrounge through decaying remains to collect those, which is not for everyone).

Collecting materials - Crab shell

Collecting materials-3

I’ll reveal more about this project in coming weeks. For now I’m counting down as I work my way through the twenty-five volumes. As of today there are twenty-two more to go.

Altered Book: Without the Heart, There Can be no Understanding Between the Hand and the Mind

Altered Book: Without the Heart, There Can be no Understanding Between the Hand and the Mind

Our move from the old apartment to the new one has been pretty time consuming over the last few weeks but as of today I am settling into my new studio space. I always find it hard to get back on track with creative projects after a move but I had to recover quickly this time because of an artist call deadline yesterday. There is a book show in the UK I wanted to take part in and it meant creating new work to fit the theme of their show and getting it done by Sunday evening.

Altered Book: Without the Heart, There Can be no Understanding Between the Hand and the Mind

This old book wasn’t great to work with because the spine was a bit broken and the pages are yellowed and brittle. I went with it anyway because it was the perfect size for what I wanted to do and don’t have a lot of other small books on hand at the moment. I ended up redoing a lot of work on this book, like folding and unfolding all of the pages because it didn’t work with what I wanted to do. I also had the whole thing complete with arms attached when I decided it needed “something more” and pulled it all apart again to add the cover image.

Altered Book: Without the Heart, There Can be no Understanding Between the Hand and the Mind - detail

At first I could not get my head around how to cut an arched niche into the open book pages because I usually do this when the book is closed and flat. It worked out rather well though and is just the right detail to house the apple. I chose to do this as a three dimensional standing piece to try something different. I also wanted the arms to be on the outside of the book and didn’t think their placement would work well in a hanging piece.

Altered Book: Without the Heart, There Can be no Understanding Between the Hand and the Mind - detail

The vine “tattoo” on the wooden arms was added by very carefully using a rubber stamp. It’s not easy trying to print a design on a rounded surface without mucking up the design, but I did it. The red thread was the final detail I added because I again felt it needed ‘something more” to tie the whole composition together.

Altered Book: Without the Heart, There Can be no Understanding Between the Hand and the Mind - detail

Materials used: book, inkjet print of photo, gel medium, plastic apple, wooden puppet arms, red thread, rubber stamp and ink, and pins.

Altered Book: Experimenting with Pull Tabs

I did a quick project yesterday to experiment with putting a pull tab mechanism, with object, into a book. I really like the results, though I’m not treating what I’ve made as a finished product. To give you an idea of what I’m talking about, think back to those childhood pop-ups books where you come across a tab at the side of a page. Pulling the tab would make something move within the book. Usually the whole mechanism is made with paper, but because I want to eventually make altered books with movable parts I probably can’t only work with paper.

Altered Book- Experimenting with pull tabs-4

Pictured above is the finished project I made the other day. Below is the simple inner workings of the pull mechanism using cardstock and part of a resistor. The pattern I learned from uses a washer/lever system that comes through a hole in the background paper to attach to whatever should be moving on the front. This method is better suited to moving something back and forth, but I wanted to move the butterflies up and down. I decided to make slits in the background paper for the wires to run along when the tab was pulled.

Altered Book- Experimenting with pull tabs-3

The tricky part was figuring out how to position the wires correctly through the background paper to match up with the butterflies, and then slip the resistors through the paper once they were glued.

Altered Book- Experimenting with pull tabs-3

The finished movement isn’t dramatic (pictured below) but I’m satisfied with having figured out a new approach I can apply to something else.

Altered Book- Experimenting with pull tabs

Here’s the top view of the project so you can see that I actually did all of this inside a real book.

Altered Book- Experimenting with pull tabs-2

Mailing List Postcard Giveaway

Yes, you heard that right. I am giving away free postcard sets to the mailing list subscribers for my monthly newsletter. If you’re not already signed up please go here to add your name and email address. I will be drawing three names and announcing them on Friday.

Postcard set

The postcard sets include five different collage images taken from my moleskin sketchbook. They’re fun, pretty, and I love getting these into other people’s hands to keep alive the tradition of sending things by snail mail.

Go. Now. Sign up.

[Edit: The contest is now closed and I have drawn the names of the three winners.)

Becoming a Paper Engineer

Last week I began exploring the idea of creating books with pop-ups and movable parts. I was inspired by an artist call for submissions and decided to use this as an excuse to push even further the creative possibilities of my altered books. My first step was to go to Chapters and start looking at pop-up books in the children’s section to get a feel for how these things are constructed. I was really blown away by some of the books I found. [1][2][3]

I ended up purchasing Paper Engineering and Pop-ups for Dummies because it seemed to be an excellent resource for the kind of information I was looking for. None of the sample projects involve incorporating the techniques into existing books but they will help develop my own ideas.

IMG_9876-Edit

IMG_9878-Edit

So far I’ve been experimenting using the projects in the book as a jumping off point, and I’m trying to focus on learning the technique rather than trying to produce a finished product. The above two photos are of two pop-up cards I created using cardstock. I came up with my own design rather than following the instructions because I really didn’t want to make a pop-up card with hearts. I kept things simple though and made sure not to worry about what I was making. It’s important to “let go” when experimenting.

IMG_9879-Edit

This airplane card is my first attempt at creating a pull mechanism, and again I was modifying the idea to suit my own purposes while learning the technique. It’s fascinating learning how to create a mechanism out of paper because it is way more complex on the inside than the simple movement of pulling the tab on the outside would imply.

IMG_9882-Edit

This 3-D paper pop-up of a lotus flower is a design I came across online as a video demonstration. It looks really beautiful and complicated, but it’s actually very simple and made from a single piece of paper.

Next up, exploring more techniques and translating what I learn into creating an altered book with found objects and moving parts.

Altered Book: King of the Beasts

Altered Book: King of the Beasts

I’ve had a love of lions since I was a kid because I was born under the astrological sign of Leo. I have also always wanted one as a pet because taking a lion for a walk would be so cool, at least until it decided to eat someone, or someone’s dog, or me. I have a whole list of inappropriate pets but for now I’m maintaining things at one small bird and two small fish. But I digress…

I think the significance of lions as my birth sign made it difficult to settle on just the right setting for this wooden lion in an altered book. I tried to make him a home in about three or four of the previous books but nothing felt right. I ended up doing a bit of internet research on lions to help inspire me but the reality of the situation for these creatures in the wild is quite depressing. They once ranged all over parts of Europe, Asia, India and all of Africa and now have mostly been wiped out in the wild.

Altered Book: King of the Beasts

More of my research led me to the rich symbolism of lions. They are often called “King of the Jungle”, but this is a misnomer since they don’t live in jungles at all but prefer to dwell in savannah grasslands and semi-arid plains. In ancient cultures the lion is considered a solar animal symbol (Leo is a sun sign) but lions are actually nocturnal. I took all of these bits of information and tried to incorporate them into the imagery of the book.

Altered Book: King of the Beasts

The rolled pages with brown leaves stamped on them became the grassy plains and also reference the jungle, while the stylized wood pieces (from a musical instrument) are the palace of the king of beasts. The two tarot cards were a lucky find so that I could include both the sun and the moon in the book. The crown on the lion’s head was the finishing touch that I added as an afterthought but it gives it the right bit of whimsy and ties things together.

Altered Book: King of the Beasts

Altered Book: King of the Beasts

Materials used: book, tarot cards, wooden toy lion, wooden musical instrument parts, Japanese paper, rubber stamp and ink, and gel medium.

Altered Book: Living Well, Sip by Sip

Altered Book: Living Well, Sip by Sip

First off the basic idea of this book, the style of folding the pages, was completely inspired by a wonderful altered book by Sharon McCartney. I liked the shape created by folding the pages in half lengthwise and tucking each one into the book. I also loved the idea of creating a niche within folded pages to contain an object instead of ones glued together flat as I’ve done in the past.

Altered Book: Living Well, Sip by Sip

This work started out as a home for a wooden lion, and then was briefly destined to be a home for a wooden kangaroo. Neither seemed quite right so I brought out the stack of teacups to play with. These little teacups have been waiting in the wings for awhile to make their way into a book. I wanted them to be stacked irregularly, and with this book I managed to pull it off. Only the cups at the top and the bottom of the stack are attached to the book, the rest float freely and can twirl and twist in place. (See the video at the bottom of this blog post for a demo.)

Altered Book: Living Well, Sip by Sip

Altered Book: Living Well, Sip by Sip

I was thinking about the idea of “tea time” as I worked on this, so I chose a few small gears from my collection of watch parts to decorate the end pages along the side. There are also two small spoons to tie into the tea theme. I bought these from RubyDog’s Art House as part of a tiny cutlery set, and the spoons are my favorite.

Altered Book: Living Well, Sip by Sip

To demonstrate the moving part in this altered book I shot this quick video using my laptop’s built in camera. You’ll need to turn the sound up on your computer because it’s a bit quiet.

Materials used: book, card stock, watch gears, metal spoon, ceramic teacups, rubber stamp & ink, metallic paper decorations, and gel medium.

Altered Book: The Loved Birds

Altered Book

This is the second of the blank books I am working with to create a series using imagery of trees and birds. I don’t think this one is as successful as the first book and the more I look at the finished product the less I like it. The different elements don’t quite come together and the branches look like antenna sticking out of the top of the book. I think I will work on this one a bit more…

Altered Book-5

The cover image is another of my black & white tree photos taken with a Holga camera. I wanted to have the doorway cut directly into the trunk of the tree to create a sense of shelter for the nest inside. The two yellow feathers are from Yuuki the lovebird and the blue stone is actually a heart-shaped piece of beach glass I found on Bowen last year. The nest came fully formed from Michael’s craft store, where I went a few weeks ago looking for supplies.

Altered Book-2

After gluing the pages together with gel medium I used a drill through the top of the book to create holes for inserting the branches. It worked better to start with a small drill bit and slowly make the hole larger rather than starting with the correct size. The paper didn’t have much resistance against the larger drill bit and I had to be careful not to destroy the book in the process.

Altered Book-3

I really like adding a little “something” to the sides of the book as a finishing touch to break up the white space, and have used rubber stamps on the last two books.

Altered Book-4

Materials used: blank book, ink jet print of holga photo, gel medium, tree branches, lovebird tail feathers, nest, beach glass, acrylic paint, rubber stamp and ink, decorative paper, and door transparency.