Revisiting Sashiko Stitching with The Craft Lab

On the weekend I attended another Sashiko Stitching workshop taught by Heather Young of the Craft Lab, this time at Collage Collage. A lot of time has passed since the first workshop at Opus, and I wasn’t feeling like I had a full grasp of the technique, which is why I enrolled in this longer, more in-depth class. Now I think I’ve got it, and I have a clearer idea of what I want to do.

We did two projects in the class, both of which are pictured here. We did a sampler to practice making the stitches in straight lines, and then we had to come up with our own design in a circle to make a small pot holder. I ran out of time before getting to try a repair on a piece of clothing I brought with me. I took a photo of Heather’s sampler (below) to remind myself of the different ways to approach a visible repair. I’m going to try one of these on my favourite jeans.

Untitled

Untitled

I’m committed to doing more with sashiko stitching going forward, and even put my supplies together in their own little container.

Repetitive Drawings

Two weeks ago I set aside the tyvek installation because it was feeling stale to work on, and did a little side trip into drawing again. I decided to do a series of repetitive drawings using metallic gel pen on black paper. To date I’ve made three of these on 12″ x 12″ black paper, and I have plans to do one or two more.

I experimented with shooting short process videos using my iPhone while working on two of the three pieces. For the top one I held the phone in my left hand while I drew with my right. That was awkward and felt unnatural because I normally use my left hand to rotate the paper as I draw. With the video below I used the Hyperlapse app to do a timelapse version of me drawing, and attached it to a lamp instead of trying to hand hold and shoot. Both videos are mesmerizing to watch because I love the smooth motion of pen on paper.

I’ll share the drawings themselves in another post.

Customizing With Triangles

I mistakenly thought I’d shared a photo of this on Instagram or my blog ages ago, but at some point (I can’t remember how long) I customized my red iPhone case with adhesive vinyl. I made up the composition of triangles as I went along.

Untitled

Pictured here is the new version as I redid some of the work over the weekend because pieces have been peeling off over time. It was a simple project but so satisfying to do. The colours make me happy on these dreary days.

Succulent Paper Succulents

I’ve had this arrangement of tiny paper succulents sitting in my studio for about a week and a half waiting for me to make a decision about what to do next. I was feeling tentative and uncertain about how to attach them, and even if I should bother. Is this something I want to explore further or is it a distraction from doing other work? Is this “real” art? What is my real artwork, and do I really want to go off on yet another side tangent changing the type of work I do yet again?

It’s a lot of questions for a cluster of tiny succulents to bring up, but that’s what happens sometimes. I’m feeling uncertain about a lot of things around my artwork, and it’s not just about succulents.

Untitled

Anyway…I adore the cute little things. They are all under 1.5″ high, anywhere from 1.5″ to 2″ across, and made from Canson Mi-teintes 98lb paper. The cluster is glued directly to acid-free white mat board, and framed in a 9″ x 9″ white shadowbox frame.

Untitled

Looking at them makes me happy in the same way I feel about seeing real succulent plants. Maybe this is the most important part, and why I am going to make more.

Expanding the Paper Repertoire

Over the Christmas break I was determined to spend time in the studio exploring ideas for a new series of work in the new year. I did not manage to get in there at all because Boris and I ended up being out of town most of the time. I did take materials with me, again with this determination to work, but I never quite got around to it. I actually find it incredibly difficult to work outside of my studio because most other places are not ideal for laborious paper cutting.

Untitled

Untitled

When the first Monday of January rolled around I finally got to work, and the pieces pictured here are some of the “sketches” I put together. I’m trying to stay away from focusing on finished work because what I really need to do is play, explore, and work through ideas. It feels like I am evolving how I work with paper.

Untitled

Untitled

The pieces I have in my head are three dimensional and made from multiple pieces of paper. I’ll share more as they come together and evolve further. I like what I see in these early stages.

Braided Rug Number Three

Why yes, I did make another braided rug before the end of last year. My sister Kathy loves my previously made braided rugs and hinted about how it would make a great handmade gift, and so I decided to make one as a Christmas present for her.

I think I started this in early November and finished on the 1st of December, with plenty of time to get it into the mail. I used a few of the leftover balls of t-shirt yarn from previous projects, but had to make a bunch of new ones out of shirts sourced at Value Village.

Braided rug number three

Braided rug number three

Braided rug number three

When I started making braided rugs in the summer I never thought I’d make three of them, and still be jonesing to make more.

Work in Progress: Playing with Paper Pieces

I’ve been feeling stuck lately so last week in the studio I gave myself time and permission to play. I’ve been wanting to make compositions of three dimensional paper cut elements, and this is the idea I chose to explore. I pulled out a bunch of coloured paper left over from other projects and used these as my materials.

Untitled

I’m exploring different shapes and started with the white piece above. I want the elements to feel organic and fit together somehow. These are all very small at the moment, only a few inches long and wide, but eventually I want to work larger.

Untitled

Untitled

Untitled

I like where these experiments are going, and I will do more work with them after the Christmas holidays. I’m excited to create new and interesting work in the new year.

A Quick Drawing Fix

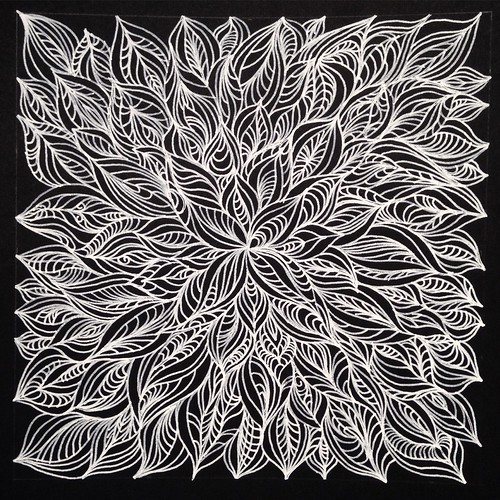
In a desperate need to make new work, last week I set aside a bit of time to draw. I didn’t really care about the results, as I just desperately needed the process. I drew a square outline in pencil to guide me, and then drew line after line in white gel pen. It was so satisfying to do this!

Untitled

Untitled

The finished drawing is 5″ x 5″ on an 8.5″ x 11″ piece of black card stock.

Scenes From A Letterpress Printing Workshop at Porchlight Press

I took a letterpress workshop this past weekend at Porchlight Press to make holiday cards. I loved looking at all of the interesting equipment around the printshop, and it made me wish I could reproduce some of my own work as letterpress prints and cards.

These are photos I took of some of the things around the shop.

Letterpress printing at Porchlight Press
Examples of lead type
Letterpress printing at Porchlight Press

Letterpress printing at Porchlight Press
Examples of wood type
Letterpress printing at Porchlight Press

Letterpress printing at Porchlight Press
An assortment of images we could use in our card designs.

Letterpress printing at Porchlight Press
A beautiful Heidelberg Press (which we did not use).

Letterpress printing at Porchlight Press
My card design all inked up on the press as we were printing.

Letterpress printing at Porchlight Press
The finished Christmas card with hand drawn details added to the decorations using metallic gel pen.

Aspiring to Create Lovely Sashiko Stitching

I attended my second ever artist workshop and demonstration at Opus Downtown yesterday afternoon. This time I learned about Sashiko stitching from Heather Young of The Craft Lab. Sashiko is a form of decorative reinforcement stitching from Japan, that is traditionally used to repair worn or torn parts of clothing. It often takes the form of white cotton thread stitched patterns on indigo cloth.

Untitled

Untitled

Untitled

The photos above are of some of the samples of work Heather brought in to share with the class. I had a lovely time stitching into an old piece of indigo dyed cotton from a workshop I did a few years ago. I need to buy proper sashiko thread and needles before I can continue my explorations with this technique.

Untitled

I have a few pieces of clothing that could use decorative repairs like this and be good as new again.