Playing with Colourful Origami Paper

Last week in the studio I made time to finally try a few of the paper folding tutorials I’ve had booked marked for ages. The purpose is to expand my repertoire of paper manipulation techniques and increase my skills.

Colourful origami paper

The project I’m sharing here is called Iris folding and I followed this tutorial on Creating Colourful Book Covers to do it. The design looks complex but it is actually simple. I used twenty-two pieces of origami paper, with twenty-one of them cut in half to create the layers.

Untitled

Untitled

Untitled

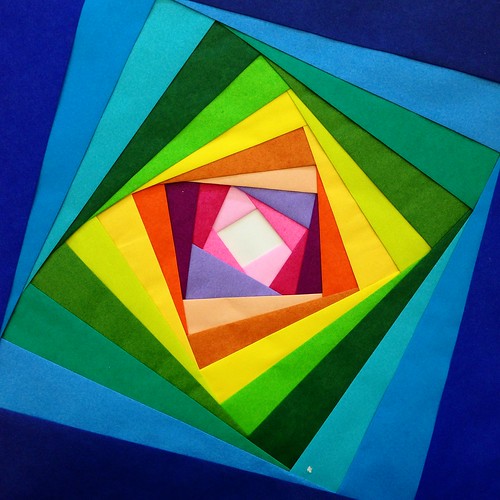
The final photo here is of the back, and you can see what I mean about layers. The look of this pattern reminds me strongly of a quilt design, but I always feel textile and paper work is similar.

Making T-Shirt Yarn and a Braided Rug

A couple months ago at Sewing Bee my friends Val and Dori decided to experiment with making yarn from old t-shirts, and then knitting it into rugs. I was intrigued by this upcycling project, but had no interest in doing any knitting. I looked around for other ideas for using t-shirt yarn and found good tutorials around making a braided rug.

Work in progress braided rug

When Boris did a clothing purge just weeks after their experiment I put aside a giant stash of t-shirts and have slowly worked away at transforming them into yarn. I ended up with twenty-seven balls of yarn because Boris had a lot of shirts packed away in his drawers.

These are excellent step-by-step instructions on how to make continuous yarn from t-shirts.

Work in progress braided rug

This weekend I began swatching colours and practicing my braiding with some of the yarn. There are three different methods that I’ve found of attaching the braids together, from sewing, gluing, and tucking. I decided to go with the tucking method and watched the two videos over on this blog post to learn the method. The videos also include how to splice more yarn onto the ends of the pieces you are working with.

Work in progress braided rug

Work in progress braided rug

I’ve swatched a circle, an oval, and attempted something like a rectangle to figure out how to shape things. I’m going with the oval for the final shape and started working on added more length to it this afternoon. I have so much yarn I can make multiple rugs or a really massive one. I’m just going to see where it goes because it’s an experiment.

Concentric Circles with lines and more lines

I’ve played with the idea before of making a piece of work with both paper cut designs and drawing, but they were both smaller and simpler. Last week I sat down at my easel with the idea of creating something more complicated, and so I dove into making this new concentric circles piece.

WIP - paper cut and drawing on paper

I outlined the circles first and then worked on creating the alternating cut paper circles, leaving the drawing until last. As I worked on the drawing I really struggled with seeing the piece through to the end because it felt like it wasn’t working. While in process, I thought the drawings and cut designs were fighting against one another and the piece was far too busy overall.

paper cut and drawing on paper

paper cut and drawing on paper

I forced myself to keep going, and when I reached the end I could finally see that it all does work together. Now I view it as a powerful piece of work that is full of energy.

paper cut and drawing on paper

The full size of this paper cut & drawing is 14″ x 17″ on archival drawing paper.

Spiral Line Drawings

The drawing obsession continues (of course it does!) but now things have shifted to longer lines flowing around a circular area. The first two drawings I completed are spiraled lines around a central point working towards a finished circle on an 8.5″ x 11″ piece of paper.

Spiral line drawings

I am kind of amazed I can do these because I’ve often struggled in the past to maneuver a pen smoothly across the page. I think my hand has been made steady and skilled by working with a knife the past few years.

Spiral line drawings

These are two of the five drawings done in the last week. I’ll share more in another blog post. I’m enjoying the process of these because they are being done for their own sake, and I’m happy with the final results.

Exploring Lines

I’ve been drawing like crazy lately because I’m obsessed with line work. The inspiration for this is the new shower curtain I acquired a few weeks ago (which you can see here) Its swirly lines design was taking over my mind and needed to be expressed on paper.

Drawings

Drawings

These are the first two line drawings I did using metallic gel pen on black card stock. It’s very soothing to do this, so of course I’ve gone onto doing many more. With these (and a few others I will share in another post) I feel my drawing skills have improved.

A Return to Play in the Studio

This year I am determined to concentrate more on making the work I want to make and not just work towards fulfilling an obligation for a show. With this in mind last week when I was in the studio I decided to just play and see where it took me.

I started with a doodle using metallic gel pen on black paper, and made a few different clusters of patterns and lines around the same page. I wasn’t really satisfied with these so my next step was cutting the paper into circles and capturing the doodles I’d drawn so far within its own circle of black paper. I went on to fill each entire circle cut piece with its own distinct doodle, starting with the first three here.

Untitled

I kept working on this over the next few days, and now I think I have about fifteen of these circles. I really like them.

Untitled

Untitled

I don’t know where I am going with this but that’s just fine. For awhile now I’ve need to play, and there’s no reason to stop just yet.

When the Back is More Interesting Than The Front

Yesterday I was about to start framing up a finished 3D paper cut piece, but needed to document it beforehand. I took this photo of the back of the piece with my desk lamp shining through the middle. It has a dramatic effect on the appearance of this piece, and makes the pattern even more mesmerizing.

Untitled

One of the things I keep thinking about and would love to explore this year is creating paper cut light boxes. I know just the person to collaborate on this with (but have yet to reach out…)

I’ll share the front of this finished piece next week. It’s sitting in my dining room looking pretty wonderful at the moment.

Hand Drawn Cards

Leading up to Christmas I decided to go on a little bender of card making. I’ve had a pack of blank white cards for years just sitting in my supplies waiting to be made into something lovely. I went at a few of them with metallic gel pens and made the abstract series of cards pictured here.

Hand drawn cards

Hand drawn cards

Hand drawn cards

I gave most of them away to friends for Christmas, but these are like small sketches of larger pieces I would like to do when I get a moment.

Leaving Drawn Circles Incomplete

These are two small drawings recently created on cards for friends. I had the impulse to make instead of buy cards, and though my original intention was to cut a design I settled upon drawing.

Gel pen drawing

Gel pen drawing

I will make a few more and give them out as Christmas cards. Maybe you will be one of the lucky recipients.

Remaking and Upcycling

I don’t know why, but I’ve been intimidated about tackling even the simplest DIY project around the house, and there are a few I’ve been contemplating for YEARS. Two weekends ago I decided to finally go for it, and started working on redoing two small projects, a wooden shelf in the bathroom, and a wooden shoeshine box. I didn’t have a clear idea for either of them, but I wanted each to be fun and colourful.

The shelf started out as an ugly dark green, and the shoeshine box started out as a beaten up object covered in greasy black polish. Neither were in great shape so I didn’t want to spend much money on the redo. I chose acrylic paint rather than latex to save money, and it seems to have worked out just fine.

Upcycled shelf

I regret not taking “before” photos of these two objects, but at the time I didn’t really care about sharing a before and after comparison. I painted many coats of white paint on each, and then had to decide what to do. I made up the designs as I went, using green painters tape to create the lines. There was a bit of clean up after I removed all of the tape, in areas where the paint snuck under.

Upcycled shoeshine box

Both pieces reside in our bathroom as organizers, and they are a welcome splash of colour to the decor. Now I’m considering my next DIY upcycling project…