Quilt collage: Pieces of Joy & Sorrow

 On a recent trip to Amsterdam earlier this year, I had the pleasure of visiting the fabulous paper store, Vlieger Papier. I browsed the shop for close to an hour before coming away with a (regrettably) small selection of patterned paper. These gorgeous materials have made their way into a new series of collage, inspired by quilts and quilt-making. 

I’ve been thinking about this idea for a long time, and have previously explored quilts as paper-cut pieces. With this one I was thinking about American “Crazy” Quilts, which are formed from very irregular scraps of fabrics, rather than following a specific pattern. I went with chunky, roughly geometric shapes for my composition, and then made the selection of pattern papers as I went along.

I love the process of creating these, because I construct, deconstruct, and then reconstruct. I construct the composition as a drawing, then deconstruct it by cutting the sections into individual pieces, then I select and glue patterned paper to each, before reconstructing all of the pieces back together again. It’s like making a puzzle.

The finished work is attached to spacers I make by hand from paper, and then float mounted it onto a 11 x 14 inch heavy archival paper as a background. I think these work best as a floating collage.


Hand in Hand with Technology

I originally wrote this post for the Craft Council of BC blog to promote my show earlier this year, and wanted to include it here.

My goals as a craftsperson are to demonstrate excellence in fine craft, achieve a high level of skill in my chosen medium of paper, and emphasize the importance of making by hand.
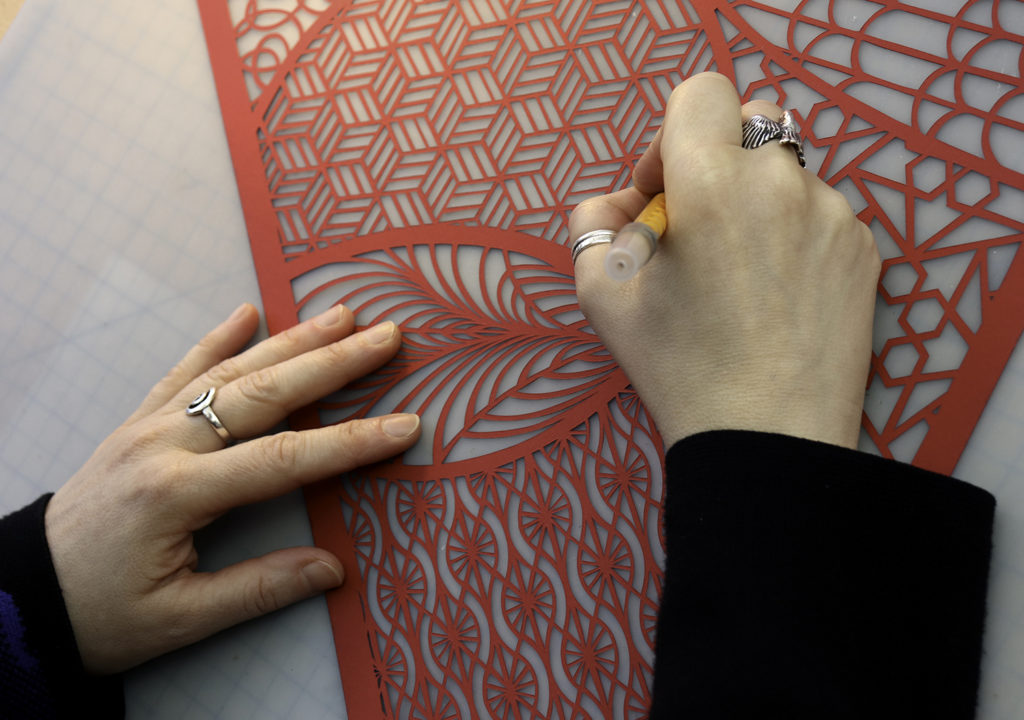
Cutting by hand

Cutting by hand

An issue I confront regularly as an artist is the misperception that machine production is superior to making by hand. People who are not makers seem to have the impression that a human being is incapable of producing an object at the same level of quality and skill as a machine. The excellence of my skills is such that people often at first glance interpret my creations as made by a laser cutter. People react in amazement when they learn what they’re viewing has been cut by hand with a simple Olfa knife blade.

Don’t mistake me for a luddite. My intention here is to ensure handmade and machine made are given equal footing and regard. I have readily employed machine cutters of various kinds to create work in the past as well as my upcoming solo show. My tendency is to use technology as a way to increase efficiency in my process, or to expand the potential of the work in terms of scale or materials.

I view laser cutting or using a digital cutter as methods of production that require a high level of skill to execute properly, and not a magic solution to producing the work I want to create. Working with paper cutting and the effort of doing this work by hand is often viewed as a waste of time. It is the repetitive nature of cutting that is the attraction for me, because it is both mindful and meditative, and gives meaning and fulfillment to the work.

Cloud Swirl – laser cut bamboo + white acrylic

I have produced a small number of laser cut pieces to date. These began as one-of-a-kind designs in paper that I recreated as digital files in order to reproduce the work in a range of materials. It has also allowed me to increase the scale of pieces. I’ve worked with Shrapnel Design, a production studio in Vancouver, because they are experts at laser cutting fabrication, and have a broad knowledge of materials. Working with them is a collaborative process that accommodates iteration, and the end result has been spectacular production pieces made from wood that are distinct from their paper originals.

The Silhouette Cameo II & machine cut drawing templates


Drawing templates cut by the Silhouette Cameo II

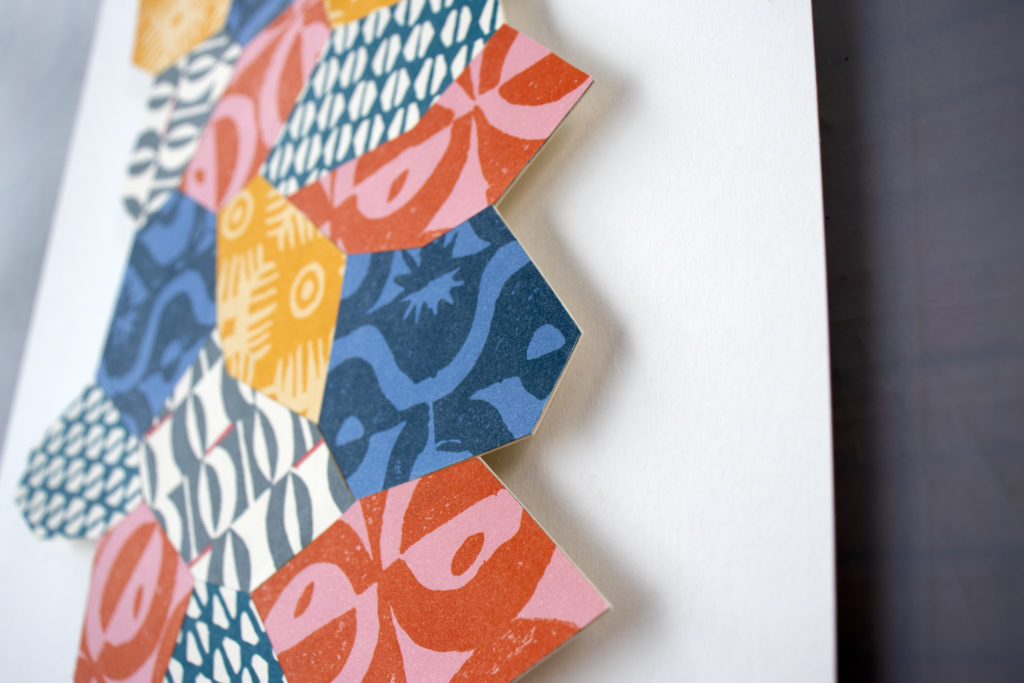
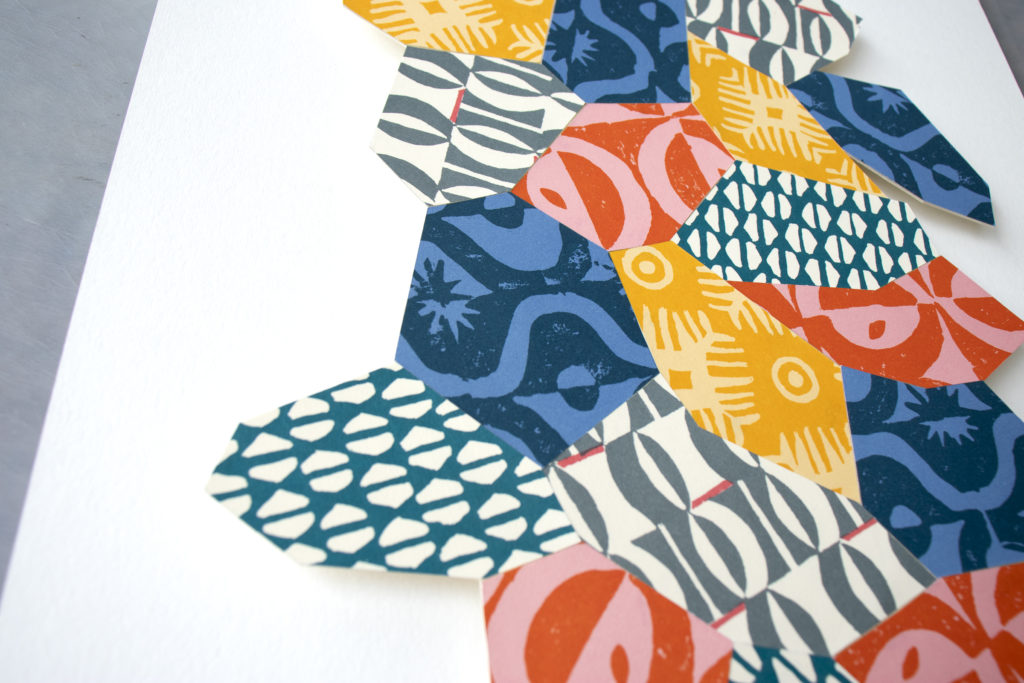
One of the pieces that will be included in the exhibition is an installation comprised of 8 pieces of 25.5” x 19.5” hand-cut paper, incorporating 40 different patterns. In the planning stages of the work I realized there were issues I could solve through the use of technology. I needed to scale up the size of the patterns, and incorporate more elaborate repeating designs. I wasn’t confident I could do either of these things by hand. My solution was to employ a Silhouette Cameo digital cutter, and draw from a library of digital design files, to produce pattern templates. I utilized these to trace each design onto the paper.

Details of the hand-cut installation. Patterns drawn with machine cut pattern templates.

I will continue to explore my process by hand, as well as experiment and learn different techniques and technologies in the creation and production of my work. Handmade fine art and crafts are a worthwhile output of their own — and should be seen as a way to celebrate expert makers. But technology and new processes, especially in pursuit of excellence and efficiency, are themselves an opportunity to expand artistic creativity and collaboration.

Whatever mediums I use, my artist’s hands and mind are always there.


Work In Progress: Printmaking/Cut Paper Collaboration

Late last year I met with my friends Rebekah and Norberto, who run The Hive Printing, to talk about working together on pieces for a show I have in 2021. I want to include screen prints but don’t have the skills the create the work I have in mind, and asked if they’d be interested in collaborating with me. Lucky for me, they were keen, even though it is something they don’t normally do

Norb produced initial test prints of two potential screen print designs in May. I worked with these to explore ways of cutting the paper that collaborates with the print, and compliments the design, while also not removing too much of the paper. My usual process is to cut most of the paper away, but I want to showcase the cutting and printing in equal measure in this case.

I think pattern cutting small sections of the prints will work very well. I drew my designs on the front of the paper in these tests, but the finished pieces will be worked from the back. Based upon these tests, I think this collaboration is going to work very well.

Work In Progress: A New Sashiko Stitching Project

I restarted this sashiko stitching project at the end of May after stalling out on it for a few months. I originally purchased a suiting fabric to make a piece but hating working with the stretchy fabric that seemed to resist my needle. I decided to switch to a new material and picked up a piece of linen/cotton blend fabric in indigo from Dressew to start again.

It was the right thing to do because the suiting was totally the wrong type of fabric to work with for stitching. I’ve been much more enthusiastic about working on this after switching materials.

I used a stencil to trace out the design of curved repeating lines. It actually inspired me to create a similar design as a paper cut piece (which I’ll share in another post). I worked on this a little bit over a week long vacation to Salt Spring Island last week and was happy to get about halfway to completion.

The finished piece is part of a trade with my friend, Barb. She will be transforming it into a throw pillow.

A Beautiful Prototype

This year I’ve returned to an important part of my process that I hadn’t been utilizing as much over the past year or two. I’ve been starting a new piece by first making a prototype of the idea. My approach with this one was to scale way down from the size I wanted to do as a finished piece, in this case 5″ x 7″ rather than the eventual 25″ x 38″.

This is Yupo Translucent, a synthetic tree-free paper I’ve been wanting to explore in my work. I decided to use it to make a layered installation piece, that I’m hoping will also incorporate backlighting. (Fingers-crossed!)

The tiny prototype allowed me to get the idea out of my head and into reality so I could confirm it would work the way I imagined.

I created this towards the end of January and have been steadily working away on the larger nine layered piece since then. I finished it over the weekend and can’t wait to share it in an upcoming group show featuring paper artists later this year. Stay tuned!

Pattern Mixing with Printmaking and Paper-Cutting

In some ways I feel like 2019 is a bit of a do-over for all the things I’d planned to do in 2018 that got washed away by the flood. Printmaking was high on the list of goals last year that was no longer possible without a studio to experiment in.

I kicked off my studio time in the first week of January with lino printing a pattern using very colourful inks on Canson paper. This was in preparation for a paper cutting and pattern mixing experiment on a large scale, and I wanted custom paper to do it with.

I printed each circle by hand, working quickly and carefully to line things up. I created it as a one-off print because I wanted something colourful and patterned to work with to see how well it would interact with the negative/positive of cut paper.

I drew a whole bunch of patterns on the back of the paper, choosing to use repetitions of geometric shapes, and a few of my favourite Japanese textile patterns. I was trying to keep them as simple as possible for the sake of the experiment because I knew cutting would take the longest.

I filmed a hyperlapse video of me working on one of the final sections the other day. My cutting process is different with these because I can make a cut to multiple pieces before shifting the paper into a different angle. With my unique patterns created through spontaneous process, I complete each shape before moving onto the next one.

I’ll share the finished pattern mixing piece in another blog post.

Work In Progress: Pattern Mixing 2.0

For the past few weeks I’ve been slowly working on the first in a series of new paper cut pieces. The work has been slow because for the first time ever I am drawing the design first before cutting. I usually generate the designs by cutting directly, with minimal pre-planning. It feels like a big shift in the work, and it definitely makes it way more time consuming to produce.

Untitled

The bits and pieces pictured here are details of this new work exploring pattern mixing, using the Japanese designs I learned to draw over the summer. The full size of the work is 25.5″ x 19.5″, cut from Canson Mi-Teintes paper. It’s been an awkward project to work on a I try to maneuver it around the easel while drawing or cutting, and not wreck the parts I’ve already completed. (It happens sometimes).

Untitled

Untitled

Untitled

It started out as an experiment to explore an idea I’ve had for ages, and I’m hoping it will end up as a successful piece of work.

Process: Block Printing on Cut Paper

Earlier in May I was putting together a few pieces of small work for Meet the Makers, an event with Crafted Vancouver. I created four scribble pieces in white paper all with two layers each. After I finished cutting the work I decided I wanted them to have colour because I am tired of white work.

I made the crazy decision to block print each layer with a single colour using a piece of circle cut lino. I inked the lino and then placed the cut pieces on top, with a scrap pieces of paper over both so I could rub the brayer and transfer the ink without making a huge mess. Below is the lovely design imprinted temporarily onto the ink after printing.

Above and below are some photos taken of bits and pieces of the process as I was working through the prints. The scrap pieces of paper used to catch the ink were a wonderful result I’ve held onto with the idea of using it in some way.


The last two photos are details of one of the finished pieces once it was framed. I’d actually like to go back and layer more colour onto the cut scribbles, but it will have to wait until I’m back in the studio this August.

Experiments with Block Printing Layers

I’ve continued with my experiments in learning how to carve and print rubber blocks. Last week I carved two more and used them to test out a few new inks purchased after my initial work in the studio, along with a metal inking plate. What a difference it makes to use it, and have more colours to experiment with. Everything included in this blog post is rough beginners work that isn’t very good, but it’s helping me figure out how to use the tools.

Work in progress: block printing experiments

Work in progress: block printing experiments

I added a bit more detail to the pattern I carved last week and used it to test out layers of pattern in different coloured inks. I love the metallics, though I’m not sure how much I will use it in my work.

Work in progress: block printing experiments

This test print is from a quick stamp I carved from a scrap piece of rubber and used it to exploring mirroring and repeating a single element. I put too much ink on sometimes, but the more I work at this the better I get a sense of how much ink is enough.

Work in progress: block printing experiments

Work in progress: block printing experiments

Work in progress: block printing experiments

I did a few quick test paper cut designs from the paper I printed because this is where all this experimenting is heading eventually. Printed colour and pattern over a cut design.

Work in progress: block printing experiments

Work in progress: block printing experiments

I have two test prints waiting to be cut this week in the studio. I can’t wait to work with them, and also create more block prints to experiment with.

Experiments with Block Printing

I’ve been slowly working out how to tackle the idea of creating custom printed paper to use in my cut paper work going forward. I don’t have the facilities available in my home studio to do screen printing because it’s messy, needs space to print and dry, and plenty of water to wash screens. I’ve considered having paper printed for me based on my designs, but I’m such a hands-on person I really want to do this myself. Looking into other printing methods has led me to explore block printing, and this week I carved and printed my first block.

I bought a starter kit from Opus just before the holidays to get me started. It contains the basics tools of a lino cutting tool with three blades, a tube of ink, one soft rubber block, and a small brayer.

Untitled

I drew a relatively simple design directly on the block using pencil rather transferring from a sketch, and started carving. As I worked I realized my design could have been even simpler for my first try because there were some small details that were challenging to work around, and way too many curves. The process is similar enough to carving paper with a knife that it didn’t take long to get the hang of it. I made use of all three sizes of blades as I worked.

Untitled

I used the finished block to print white ink (from an ink pad) onto a piece of black card stock. I did an initial printing to check the design and then re-carved a few spots that needed fixing. I think next time I need to carve more deeply.

Untitled

Untitled

I finished my little experiment by doing a quick paper cut from the printed material to see how the different colours would interact with the design. It was only then I thought about my choice to work in black and white when the main purpose of printing is to bring more colour into my work. Ha!