Bringing Together Paper Cuts and Collage

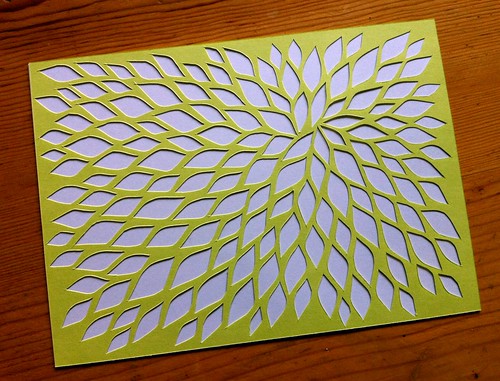
I realized yesterday that I need to come up with a title for the series of organic looking paper cut forms I’ve been working on. My mind is drawing a blank at the moment so I’m open to suggestions.

When I shared some of these the other week they seemed more like a sketch than a finished piece. I’d been contemplating what to do further with them in terms of finishing and display. I liked backing the paper cut designs with coloured paper, but I hated the idea of enclosing them in traditional matting and framing. Then I came across Bill Zindel’s Geometric Collage and my brain began churning around the idea of collaging them with many different patterned papers.

I used the same three different patterned origami papers with both of these, and pieced it together at the back. I backed everything with a second piece of black card stock and cut away the excess paper. They are mounted onto wood panels (what is normally the back) and I painted these black for a more dramatic effect.

Origami collage paper cut-3
Untitled | 6″ x 6″

Origami collage paper cut-4
Untitled (detail) | 6″ x 6″

Origami collage paper cut
Untitled | 8″ x 8″

Origami collage paper cut-2
Untitled (detail) | 8″ x 8″

The patterned paper gives them a nice KAPOW of colour and plays off the smaller shapes within the larger form.

Once I figure out my pricing I’ll be making these available in my Etsy shop, as well as sharing them with the public at Got Craft? on May 6th.

Exploring Shape and Form

For the past few weeks I have been slowly working on a proposal for an artist residency happening later this year. I began writing it over a month ago but realized there was so much preliminary exploration and thinking I needed to do before I could really write the thing. So I backtracked a bit, sifted through my ideas and thoughts, and figured out what I wanted to do. Yesterday I sat down again to make a proper attempt at writing and this morning was able to send off a first draft to a team of editor friends for review and feedback.

The paper cut designs I’ve been focused on lately is part of the work I am hoping to explore further with this residency. I just hope I’m articulate enough in my proposal to make it interesting.

These four designs were created over the course of the past week. I’m using black card stock, and backing these with brightly coloured paper. Each iteration begins with the same basic crescent shape to create a larger organic form, and is done through freehand cutting of the paper.

Paper cut-2

Paper cut-4

Paper cut

Paper cut-3

I’m excited to see the group of these together. I know I can keep working in the same way to create infinite variations of these organic designs. They are enjoyable to make because there is an aspect of meditation to the repetition of cutting, and looking at the finished form gives me the same feeling I get when working on them.

Paper Cut: Mapping Out New Work

I’ve never been much of a sketcher of ideas, but lately this seems to work well when it comes to working on new paper cut designs in my sketchbook. But instead of a pencil I work with an exacto blade.

Sketchbook Page

The top image is of the sketchbook work, and the bottom image is of a “paper test” on a scrap piece of map.

Paper cut map

I really want to work with recycled/reclaimed paper and since I recently acquired a pile of large topographic maps, this is the paper I hope to work with going forward with the paper cuts. I really like the combination of materials and design, and the paper the map is printed upon is fairly decent to work with.

Work-In-Progress Paper Cut

Last week I mentioned beginning work on larger paper cut work, and this is the second of the two. The paper size is approximately 19″ x 24″ and is a thinner stock than the grey paper I was working with last week to create the flower shaped paper cut.

I’m enjoying working with the basic crescent shape and having the design flow around the page. Sometimes they become tornados, then seashells, and morph into imaginary microscopic organisms.

When I’d cut away about a quarter of the paper I came close to calling it quits because it seemed like an impossible amount of surface area to work with. I was overwhelmed because I don’t normally work this large. I’ve managed to push past that phase and will obsessively cut away paper until I reach the end.

Paper Cutting and Working Larger

For the past month I’ve been creating small paper cut designs to practise and refine my technique. This week I wanted to begin working larger but I wasn’t sure about exactly what I wanted to do, so I started playing around with ideas in my sketchbook. It seems funny to use a sketchbook for paper cutting instead of drawing but it did lead me in the right direction.

I went with smaller cuts to create a more intricate design. The image below is the one I created in my sketchbook

Work in progress - Paper cut in sketchbook

I took the same design and began working on a grey piece of paper that proved to be ridiculously hard on the hands to work with. It’s a thicker stock than I’ve worked with previously and it wore through numerous blades and exhausted my fingers. I’d originally intended to cut the whole piece of paper, but I’m going to leave it as it is and move on to something else.

Paper cut work in progress

Finished paper cut design

This is the final design with seven flowers. I’m thinking about cutting away most of the rest of the paper so there is just a thin outline of grey around the main design. Hopefully my fingers can withstand it.

Next up: going even larger (but with thinner paper)…

More Paper Cut Designs

The paper cutting has continued, though I’ve slowed down a bit this week to concentrated on making a series of small collages. I owe a debt of gratitude to the Sketchbook Project for inspiring new work in a few different directions. These are my favourite recent designs, all of which were created on 9.75″ x 6.75″ sized paper.

Paper cuts

Paper cuts-10

Paper cuts-7

Paper cuts designs

While I’ve been enjoying the process because it feels quite meditative, I’m reaching the point where I want to create a finished piece. But I haven’t quite figured out the form this will take because I still have so many ideas to explore.

Obsessed with Cutting Paper

The paper cutting obsession, which started with the Sketchbook Project, continues on. Tiny pieces of cut paper and worn out blades are starting to pile up around here, but I’m learning much in the process. These are three of the most recent ones I’ve made using a pack of coloured paper picked up at Yoko Yaya.

Paper Cutting

I like the process of making these designs because it’s loose, flowing and spontaneous. I grab a piece of paper, decide upon a single shape as a starting point for the design, and then start cutting. I try not to over think things and just let the design flow across the page. It’s a wonderfully meditative process.

Paper Cutting

Paper Cutting

All three of the paper cuts featured here are 5″x7″, and took between one to two hours to create. I want to go larger with these and also play around with layering a few of them together within a frame.

Work-In-Progress: The Sketchbook Project

I started working on my Sketchbook Project at the end of last week and things have been going very well. I decided I wanted to experiment and keep things loose with this and so far it’s working wonderfully well.

I’ve chosen to do a mix of paper cuts and collage on alternating pages, exploring the theme of Thread and Surface (one of the ten you have to choose for the Project). The paper cut pages will overlay the collage pages and create an additional layer. I’ve been concentrating on the paper cut designs first and have been creating them free hand with an xacto knife. These are three of the seven I’ve completed so far.

Sketchbook project work-in-progress

Sketchbook Project

Sketchbook Project

I’ve been choosing a different shape to focus on for each one and just letting the design flow from there. It’s an addictive process to work with – creating designs from cutting paper – and all sorts of additional ideas have grown out of it.

I’ll share more as the project progresses. I can’t wait to get started on the collage pieces next.

Pleated Paper Folding

On the weekend I met up with origami artist, Joseph Wu, to hang out and learn how to fold paper into pleats. Joseph had offered to share his vast knowledge of paper folding techniques when he saw my latest altered book experiments on Instagram.

Pleated folded paper

It took me forever to fold the first sheet of paper, and I’ve gotten faster over the last few I’ve done. Folding pleats is both simple and harder than it looks, and you can’t be afraid to push the paper the way you want it to go.

Pleated folded paper - detail

Pleated folded paper - detail

Pleated folded paper

I’m not yet sure what I’m going to do with this new technique, but there are interesting installation ideas developing.