Work In Progress: Spirals and Waves

Progress on this piece has been much slower than I would have liked but I managed to put the finishing touches on it yesterday. The actual size is 19.5″ x 19.5″ hand cut from 98lb Canson Mi-Teintes paper. I think this is the largest 3D paper cut piece I have created to date.

Untitled

Untitled

I drew an outline of two curves spiralling into one another and filled both in with tiny delicate leaf shapes that lift away from the surface. About half way through the work I decided to draw a fuller curve for each shape to give the composition a stronger sense of flow.

Untitled

Untitled

My intention is to frame the work with the 3D bits as the back of the piece instead of the front surface as I normally would. The picture above shows what this looks like when the paper is backlit, and the photo below is a closeup detail of the surface. It has a wonderful textured.

Untitled

Untitled

I like the piece but looking at it makes me think about all the things I wish I could go back and do differently. I guess that is why my process is iterative. I always have the opportunity to do it again a slightly different way.

Work In Progress: Stitching a Denim Skirt

When I started this clothing embellishment project in February I thought I would end up using a traditional sashiko pattern as my chosen design, but the highly structured approach didn’t suit what I had in mind for this skirt. I undid the work I’d started and took it in a completely different direction. I stitched a few small circles placed randomly around the fabric area to start and then realized how tedious it was going to be to make an uncounted number of additional small circles before it felt complete.

Untitled

Untitled

I switched directions again and decided to cover more of the skirt with stitched lines, which is really what I love about sashiko – all those lovely lines made into shapes and patterns. I made a large triangle design of lines on the middle front, and two triangles facing in opposite directions on either side of the skirt. It looks terrific even though the overall design is quite random.

Untitled

Untitled

Once all of the triangles are finished my plan is to go back and add more circles to different parts of the skirt. I’m hoping to get most of it done later this week. I can’t wait to wear it.

Work In Progress: Multiple Paper Cut Sketches

Before starting another 3D paper cut piece last week I decided to do a few small sketches to work out an idea I’ve had in my head for the last while. I wanted to make two half circles slightly offset at the centre, and cut these with 3D leaf shapes.

Paper cut sketch

I drew outlines on a scrap piece of paper and did two different sketches, one working from the centre outwards and the other moving from one side to the other. I didn’t actually like the results (which made me so glad I’d decided to sketch this idea first), because it felt clunky and stiff.

Untitled

I decided the outer shape needed to be curved and graceful to guide the flow of the cutting, so I roughed out a third sketch and only partially finished it because it felt right at last. I moved onto working with a large piece of paper, and will shared progress on it another time.

Untitled

One of the things I’m hoping to do with the finished piece that has come out of this sketching is frame it with the 3D bits hidden. What is usually the back of these will be displayed as the front. It looks something like the backlit example I have included here (but it won’t have light within the frame).

Paper cut sketch

I’m glad paper cut sketching is becoming an important part of my process once again.

A Heart for the Day of Hearts

I drew this heart as a gift to give friends we were joining for dinner on Valentine’s Day. It’s inspired by line work I revisited last week as I worked on a commission that combines paper cut and drawing. I decided to shoot a hyperlapse of the work in progress and shared it on Instagram.

It’s fascinating to me to watch my drawing skills in action at a speeded up pace. It takes away all the long pauses between making marks as I think about the flow of lines across the page and what my next move should be. My line work is exact and seems super confident in a way it does not feel as I’m doing it. Watching hyperlapse videos of my own work makes me better appreciate the value of my own skill.

A post shared by Paper artist (@rachael_ashe) on


You can watch the slightly longer and uncropped version of this Hyperlapse on Flickr.

Revisiting My Paper Cutting Sketchbook

I want to take my paper cutting work in a new direction incorporating different shapes because the usual ones are starting to feel stale. I’ve been working with them for five years now, and it is time to expand my repertoire of shapes. I brought out the sketchbook I use for brainstorming paper cutting ideas and did a bit of testing. Some of the shapes are variations of the lovely crescent I use in much of my work, and I guess it’s because I love cutting a curve over a straight line.

Sketchbook

I haven’t yet settled on an idea yet to go forward with because I have more sketchbook play ahead of me.

Sketchbook

It’s hard to be in this place of not knowing what to do next, but I’ve been here enough times to know I need to give myself time and space to explore. It’ll lead somewhere eventually.

French Knots on Paper in Blue

I started working on a fourth French knots in paper piece during Culture Crawl weekend to keep myself occupied during the slow times, and also to demonstrate process to visitors. There are so many people who did not realize the framed embroidery pieces were made with thread, so it was perfect to have something on the go to show them how it’s done. I didn’t get very far with it during the Crawl because I can’t talk and stitch at the same time, but I decided to finish it in the following weeks.

Untitled

With this piece I chose blue thread rather than grey as with the previous ones, but continued using Strathmore 90lb mixed media paper as the canvas. I went with a design where I alternated solid circles with dots. I really like making knots close together so there is a dense amount of thread, but it makes it tricky not to tear the paper while sewing. When this happens my solution to repair it is to use archival document repair tape as I do in paper cutting.

Untitled

Untitled

This may be the last of these thread and paper works for awhile as it’s time to get back to concentrating on paper cutting work!

Making Marks with Thread

I’ve been working on another clothing embellishment project in my head over the last few weeks, and when I sat down to finally start it on Monday I realized the idea was not going to work well with the fabric. I wanted to do more sashiko style patterns but the type of fabric doesn’t take well to drawing out the design first. So I threw that idea out the window and started looking through the library books I happen to have on hand at the moment and found a beautiful idea to try. The book is called Mark Making by Helen Parrott and came recommended by my friend, Amanda Wood.

Mark making with thread

I brought out the sampler to practice the style of stitching, and get a feel for how to move around the surface and group the threads together. I did the blue ones first and then the red, and these second set were so much better than the first. It was exciting to see my improvement so quickly.

Mark making with thread

Now I’m on to starting the actual project, and can’t wait to get started in the studio today. I’m hoping to get it done it time for Christmas.

French Knots in Paper Too

I did not do as thorough a job of documenting this piece as I did with the first one. I chose to create a less elaborate design with this piece, and work with larger circles in a slightly different way. I can’t decide whether or not I like this french knot composition as much as the others because it feels too simple, as if it needs more to make it complete.

Untitled

In the photo above you can see the holes punched in the paper before stitching. I love this part of the process because it has a satisfying feeling and sound when the needle go through the paper.

Untitled

This is the second of three french knots in paper works I decided to create for the Eastside Culture Crawl. I do plan on making more because I have fallen in love with the process.

Drawing with Thread Workshop

I was excited to take the Drawing with Thread workshop taught by my friend Amanda Wood at Collage Collage last weekend. She is a textile artist working in weaving and stitching, and I was curious to see what I could take away to apply to my recent stitch and embroidery explorations.

Untitled

Collage supplies at Collage Collage

Untitled

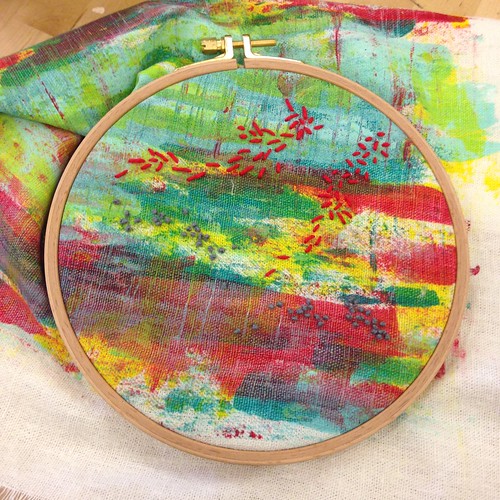
Linen painting with fabric paint

We started things off with a warm up exercise working with collage and colour, and then transitioned into our stitching projects by creating a base to work with. Using fabric inks we painted pieces of linen, and I chose crazy bright colours. I am not a good painter, and was not happy where I ended up with the painted surface but I wasn’t going to worry about it in a workshop where I’m suppose to play and explore.

Untitled

Amanda brought piles of beautiful thread for us to use, and it became really hard to choose colours to work with. She did a quick demo of different types of stitches to try and then gave us time to work. I did a bunch of french knots as a warm up, and then explored the seed stitch. It is now a new favourite of mine.

Untitled

Stitching demo by Amanda Wood

Untitled

The piece above is what I was able to accomplish by the end of class. I like the piece so much more than I thought I would because of the mark making of the stitches. I plan to work on this a bit more over time and see where it ends up.

Making Clothing New Again Through Sashiko Stitching

This is an upcycling project I was thinking about all summer and did not have a breakthrough on until two weeks ago, shortly after the French knot obsession began. The piece of clothing is a favourite red coat I bought secondhand over ten years ago, and it has been sitting unworn and in need of repair for the past few years. And then many years passed….

I love this coat too much to simply throw it out, so I’ve had it in mind to get it repaired (and will when the stitching is done). With the advent of sashiko stitching in my life I started thinking about adding a design to the surface, and bought different coloured embroidery threads earlier in the summer with the intention of starting the project. But then I was completely stuck on coming up with a design. I’ve been using a plastic template of concentric arches to draw the lines using a frixion ball point pen, and then adding tiny stitches in blue thread.

Sashiko stitching

I recently completed the first part of the work by adding six of these designs around the coat’s hem. The next phase will be to add more designs around the sleeves, and maybe the pockets. It looks so good!

Sashiko stitching

A video posted by Paper artist (@rachael_ashe) on


I shot a short timelapse video as I worked on the final series of arches around the hem. I wish I could stitch this quickly in real life (but I always think that when I watch a timelapse of my work).