Translating Interdimentional Loops From Paper to Wood

In my latest session with the laser cutter at Maker Labs last week I used the time to cut a more complicated design. The piece is based on a drawing I did over the summer (as part of the daily drawings on circles) and spent a considerable amount of time carefully tracing it in illustrator. When I started I did not realize how much work it would take to clean it up and turn it in a vector file worthy of laser cutting. The original is below.

I cut the piece from bamboo ply leftover from previous laser cutting projects from a few years ago. It looks striking in the wood, but the longer I examine it, the more I want to go back and tweak a few things with the composition. The piece is 16 inches in diameter, while the original drawing is 3.5 inches in diameter. My aim is to have one fabricated in a much larger size eventually.

Untitled

Untitled

I have one final laser cutting session booked this Friday before the residency comes to an end, and I’m hoping to use it to try a cutting material I haven’t used before.

Testing Materials During The Tools for Women Residency at MakerLabs

I hit the ground running in early August, just a few days after I returned from our two month sabbatical I started a two month artist residency at MakerLabs. The Tools for Women residency is a new offering they started this year to encourage and foster more women to use the space. There are cohorts of four people from diverse backgrounds starting each month, with the first four weeks spent on classes, and the rest of the time is for exploring, experimenting, and developing skills.

My main focus has been on learning to use the laser cutter, and testing various materials. The first few photos are details of the scribbles I laser cut from Canson paper, just to see the results. It would be so nice to iterate an idea and not have to do it by hand every time.

Laser cutting experiments

Laser cutting experiments

My second session of materials testing was to cut a few of the same scribbles from coloured acrylic. The colour choices were limited because I was using whatever MakerLabs happened to have on hand in the store. I’m happy with these two pieces, and feel they work well in the colours and materials. I really want to make larger ones.
Laser cutting experiments

Laser cutting experiments

I like the layered shadow and colours the cast by the transparent fluorescent green scribble. It’s such a great affect.

Laser cutting experiments

I have a couple more weeks remaining of the residency, a few more sessions with the laser cutter scheduled, and more material tests to tackle.

Process: Block Printing on Cut Paper

Earlier in May I was putting together a few pieces of small work for Meet the Makers, an event with Crafted Vancouver. I created four scribble pieces in white paper all with two layers each. After I finished cutting the work I decided I wanted them to have colour because I am tired of white work.

I made the crazy decision to block print each layer with a single colour using a piece of circle cut lino. I inked the lino and then placed the cut pieces on top, with a scrap pieces of paper over both so I could rub the brayer and transfer the ink without making a huge mess. Below is the lovely design imprinted temporarily onto the ink after printing.

Above and below are some photos taken of bits and pieces of the process as I was working through the prints. The scrap pieces of paper used to catch the ink were a wonderful result I’ve held onto with the idea of using it in some way.


The last two photos are details of one of the finished pieces once it was framed. I’d actually like to go back and layer more colour onto the cut scribbles, but it will have to wait until I’m back in the studio this August.

Making & Printing for Build It Day

Last week I collaborated with my co-worker Rachel Teo (yes, we have the same first name) on a printing project for Build It Day at Steamclock Software. It’s an internal event we’ve started to have every six months to give everyone the opportunity to work on a personal project. Rach and I usually collaborate on something because we are the only ones who are not software developers.

We decided to tackle making a lino cut print as a commemorative piece of swag for everyone in the team. We chose the quote, “Whatever good things we build end up building us”, by Jim Rohn as the basis of our design to relate to Build It Day. Rach chose the typeface and composed it digitally for us to transfer onto lino for carving by hand.

Lino print collaboration

I spent most of the day carving this 5″ by 5″ piece of lino with the text. We had a few setbacks in the process, which I won’t get into, and had to start over again around mid-day, but I somehow managed to get it finished and print-ready before end of day. It was difficult work because I am not an experienced carver and some of the font details were small.

Lino print collaboration

Lino print collaboration

While I was doing that Rach worked on our colour scheme with the selection of ink and composition of the overall design using additional rubber stamps (already carved, thank goodness!) She did all of the printing and added in the carved text once I had it completed.

Lino print collaboration

Lino print collaboration

The finished print looks amazing, with two different colourways to choose from. It’s not obvious from the photos but the inks used in the border design are metallic. Each print is 8″x 8″ cotton watercolour paper.

Lino print collaboration

Lino print collaboration

By the end of Build It Day we were exhausted but totally thrilled to have pulled off this project in one day. I’m excited to get mine into a frame and up on my wall.

Experiments with Scribbles

I’ve wanted to explore looser, less defined shapes with my work after a recent conversation with an art consultant. It got me thinking about making cut paper designs based on scribbles. I started with a few scribbled drawings in a sketchbook to get the idea down on paper. I wanted to see if I could consciously doodle lines in a random way that could be interpreted in cut paper.

Scribble

Scribble

I quickly moved on to making a prototype by drawing looping lines and figuring out the best way to approach cutting it out. It felt like I needed to rethink how I did things because it’s a series of intersecting lines, and I have to plan ahead carefully on how and where to place cuts in relation to others.

Scribble

Scribble

I made this test piece from Japanese Gampi paper I bought in Toronto last year. I want to incorporate more diverse types of paper into my work than I’ve used in the past. This material cuts beautifully and is much sturdier than I’d realized.

Scribbles

The finished piece is different from my usual hand cut designs, at least at this first pass. I am excited by this idea and can’t wait to explore things further.

Experiments with Block Printing

I’ve been slowly working out how to tackle the idea of creating custom printed paper to use in my cut paper work going forward. I don’t have the facilities available in my home studio to do screen printing because it’s messy, needs space to print and dry, and plenty of water to wash screens. I’ve considered having paper printed for me based on my designs, but I’m such a hands-on person I really want to do this myself. Looking into other printing methods has led me to explore block printing, and this week I carved and printed my first block.

I bought a starter kit from Opus just before the holidays to get me started. It contains the basics tools of a lino cutting tool with three blades, a tube of ink, one soft rubber block, and a small brayer.

Untitled

I drew a relatively simple design directly on the block using pencil rather transferring from a sketch, and started carving. As I worked I realized my design could have been even simpler for my first try because there were some small details that were challenging to work around, and way too many curves. The process is similar enough to carving paper with a knife that it didn’t take long to get the hang of it. I made use of all three sizes of blades as I worked.

Untitled

I used the finished block to print white ink (from an ink pad) onto a piece of black card stock. I did an initial printing to check the design and then re-carved a few spots that needed fixing. I think next time I need to carve more deeply.

Untitled

Untitled

I finished my little experiment by doing a quick paper cut from the printed material to see how the different colours would interact with the design. It was only then I thought about my choice to work in black and white when the main purpose of printing is to bring more colour into my work. Ha!

Sewing Improv and a Case for Sunglasses

For someone who is an inexperienced sewer I seem to make many sewing projects without a pattern. I’ve done this in the past to make a laptop case for Boris, bedroom curtains, and pillow slip covers. They’ve all turned out okay, so I keep diving in with my patternless improv.

I’ve been wanting to make a proper case for my sunglasses, which came with a crappy slip bag that has slowly come apart over time. I did not photograph any of the work in progress of this project, so you can only see the end results. I used a piece of scrap padded foam left over from Boris’ laptop case project, and chose a grey and white fabric square recently purchased from A Spool of Thread.

Sunglasses case

I measured, cut, sewed, and voilà, the glasses have a very simple case to protect them while bumping around in the bottom of my bag.

I should really put more time into learning more advanced sewing techniques.

Work In Progress: Ideas for a Clothing Embellishment Project

I have many pieces of clothing that are waiting in the wings to receive an awesome upgrade of stitching, but at the moment I’ve been focused on sorting out a design to add to a stretch denim skirt I purchased secondhand last summer. Pictured above is the start of a sashiko design made up of hexagons that I thought for sure was the design of choice. I changed my mind after stitching the first hexy as a test because there is a very specific way I am supposed to proceed in sewing these patterns and because of the flow I had in mind it was going to be tricky. The thing that turned me off was realizing I wasn’t excited by the work ahead.

Yesterday I sat down for an hour or so to make time to experiment with another idea I had in mind of creating textured shapes (not necessarily circles) using the straight stitch. I made one small circle on my trusty sampler and I love how it turned out. Even better, I feel SUPER excited to make more of these on my skirt. That feeling is how I know I have stumbled upon the right idea.

Untitled

More recent work on my sampler is this experiment with using French Knots to create freehand designs and texture. This is a test for an idea I am sorting out to do on my winter coat. I’m waiting to get started after the weather warms up and I no longer need to wear it. The idea I have in mind is to do swirls of French Knots in various shades of reds and pinks. I want to make it into the spectacular winter coat I have often dreamed of but could never afford to buy.

Untitled

I’m sure I will come up with more clothing embellishment projects once these ones are complete.

Drawing with Thread Workshop

I was excited to take the Drawing with Thread workshop taught by my friend Amanda Wood at Collage Collage last weekend. She is a textile artist working in weaving and stitching, and I was curious to see what I could take away to apply to my recent stitch and embroidery explorations.

Untitled

Collage supplies at Collage Collage

Untitled

Linen painting with fabric paint

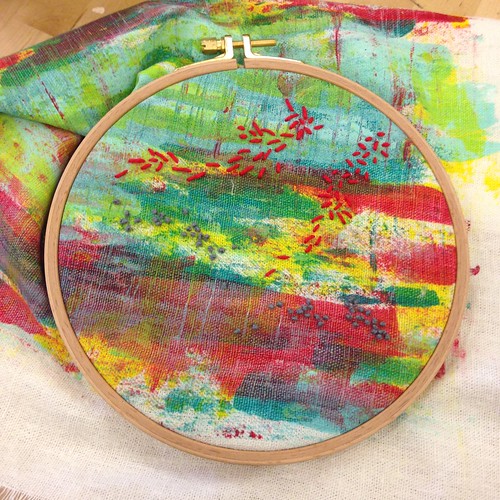
We started things off with a warm up exercise working with collage and colour, and then transitioned into our stitching projects by creating a base to work with. Using fabric inks we painted pieces of linen, and I chose crazy bright colours. I am not a good painter, and was not happy where I ended up with the painted surface but I wasn’t going to worry about it in a workshop where I’m suppose to play and explore.

Untitled

Amanda brought piles of beautiful thread for us to use, and it became really hard to choose colours to work with. She did a quick demo of different types of stitches to try and then gave us time to work. I did a bunch of french knots as a warm up, and then explored the seed stitch. It is now a new favourite of mine.

Untitled

Stitching demo by Amanda Wood

Untitled

The piece above is what I was able to accomplish by the end of class. I like the piece so much more than I thought I would because of the mark making of the stitches. I plan to work on this a bit more over time and see where it ends up.