Work In Progress Paper Cut Things

After Currents of Nature went up a few weeks ago I was left with time to decide on what I wanted to work on next. In an usual turn of events I’ve started working on multiple things at once. The work I’m sharing here is one of the two.

Untitled

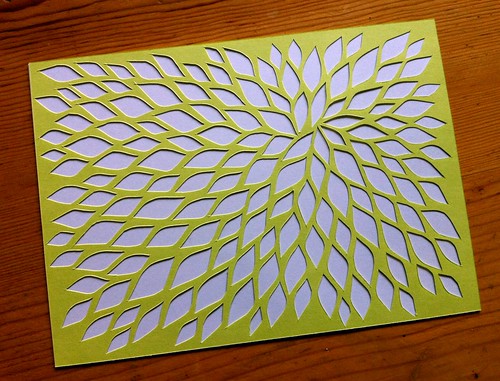
The idea began with playing around with painting the paper because I’m starting to feel the work needs colour. I was working with a scrap piece of paper and ended up cutting this small flower shape. Suddenly I started thinking about creating a sculpture from multiple small paper cut shapes, and so I decided to cut more of these flowers. When I had thirteen of them it didn’t feel like enough so I’ve decided to keep going with this as a long term side-project. At the moment I have twenty of these flower/starburst shapes, and there will be many more to come.

Untitled

Untitled

Sometimes I’ve been cutting these when I watch tv, and it feels a bit like my version of knitting. I’m not yet sure where this is going to end up, though I do have some things in mind.

Thank goodness I took the time to experiment.

Paper Cut Work: Down the Rabbit Hole

Earlier in the fall I was invited to be part of an upcoming group show in Victoria that explores the theme of Alice in Wonderland/Through the Looking Glass. I hadn’t had any time until last week to figure out and create something new for this show because I don’t currently have anything appropriate. I was stumped and uninspired at first because the theme doesn’t really fit into my current body of work, and I’m reluctant to create one-off pieces just to satisfy the requirements of a group show.

I was actually really close to passing up on this opportunity. But I surprised myself and found my way through to creating work I am very pleased with. The White Rabbit was my inspiration and he took me down a rabbit hole of layers and layers of circles.

Paper Cut Work- Down the Rabbit Hole
“Down the Rabbit Hole” | 10″ x 10″

Paper Cut Work- Down the Rabbit Hole-4

Paper Cut Work- Down the Rabbit Hole-5

Paper Cut Work- Down the Rabbit Hole-3

Paper Cut Work- Down the Rabbit Hole-2

Both of these are 10″ x 10″ with the cut paper mounted inside a wood cradle panel. There are three layers of paper in each one, and I used a compass cutter to cut the circles. I’d been playing around with this idea in my head because I have a circle cut pile of maps left over from a previous project, and I intend to do something with them. The layers work very well and build on my recent work of a single repeating shape.

To create the two rabbit silhouettes I sourced images of the white rabbit from google images, printed these out to the correct size and used them as a template. I left the details of each of them very minimal on purpose.

Paper Cut Work- Down the Rabbit Hole-6
“Down the Rabbit Hole” | 10″ x 10″

Paper Cut Work- Down the Rabbit Hole-9

Paper Cut Work- Down the Rabbit Hole-8

Paper Cut Work- Down the Rabbit Hole-7

I showed photos of these on Instagram as I worked on them last week and was thrilled to have such a positive reaction to the work. I’ll share more details about the show closer to the date next year.

Paper Engineered Halloween Costumes

Out of some crazy desire to try my hand at paper engineering in three dimensions, a few weeks ago I decided to make Halloween costumes for Boris and myself. The idea was somewhat driven by a commercial project that came my way and would involve making life-sized props from paper. Just the thought of working on these had my mind whirling with ideas so I decided to channel some of these into making the costumes while I waited to hear confirmation about the project.

For Boris I made a two foot high giraffe costume from yellow poster paper. It fits over his own head with a window in the neck for his face to peek through. It was nothing short of hilarious to have him continually try it on and all the silly antics that ensued. Boris painted the brown spots himself, which was the one thing I was willing to hand off to him.

Why a giraffe you might ask? It was something we’d joked about the previous year and I decided we needed to make it happen.

paper costumes - giraffe

paper costumes - giraffe

For my own costume I decided to make antlers, which is something I’ve always wanted to have, but with the whimsical twist of adding red leaves. I think of them as “tree branch antlers”.

As with the giraffe, I made these from poster paper. The trickiest part was figuring out how to attach them both to something and have them balance on my head. I used a black headband with elastic as the fitted strap that goes around the back of my head. They seem to balance just fine.

paper costumes - tree branch antlers

paper costumes - tree branch antlers

I finished the costumes the day before I began the more commercial project of making paper props for a video shoot. More about this in another post. Both projects have been a terrific learning experience, and made me tap into additional skills I wasn’t previously aware of.

Paper Cutting in a New Dimension

I have stumbled upon yet another variation of cutting and working with paper. I sat down to play in my sketchbook last week and came up with this lovely technique I hadn’t thought about before of making a cut and then folding the paper. Suddenly my paper cuts have become three dimensional and I love it.

This top image is the idea I worked on in my sketchbook. I used the compass cutter for this one before moving outside the sketchbook and on to a larger piece of paper. For the larger piece below I used an xacto knife and cut the curves freehand.

Paper cut and folding in my Sketchbook

I chose to work with this chart of geological survey information as my paper more because it was something I could grab quickly and not worry about experimenting with. It’s a happy accident that the lines of the chart combine in an interesting way with the curved shapes of the paper cuts.

Paper-cut and folding
Paper-cut and folding - detail

It’s no wonder I am so addicted to the process of paper cutting because there is always something new to learn.

Mapping Circles to Triangles

I thought I’d share some quick snaps of the overall piece made from maps I shared a detail of last week. The individual pieces are connected together in long strips but the strips aren’t yet attached to each other. I still want to play around with composing the overall form and figure out how many paper cuts it makes sense to include. I feel there is an infinite number of ways these triangle pieces could be arranged and composed.

69308df8-172b-43fa-89ce-3b14d5f77102

The picture below is what remains of the maps after I’ve cut all the circles. I’ve set these aside to use in some future collage. I love how they all look layered together.

Untitled

I’ve been working on a few other projects and haven’t been able get any further with this. Hopefully I can get some focused time in the studio later this week and will share more.

Rearranging the Landscape of Maps

All the playing with paper last week is leading somewhere interesting this week as I continue to work with maps. I’ve been cutting many circles and transforming them into triangles, which then in turn attach together to become a larger form. The play of shape, form, with the colours and textures of the map paper are making for interesting things.

Work in progress - Cut maps

Work in progress - cut maps

I haven’t included a photo of the overall work, but it’s about 33″ x 27.5″ at the moment and is made up of about one hundred cut circles. The bottom photo here hints at where I hope to go with this, and intersperse small paper cuts throughout.

Playing With Paper

This week I’ve been brainstorming ideas for upcoming proposals and projects, which has led to playing with paper in new ways. I broke out some of my books about working with book pages for ideas. These are some of the things I’ve ended up with.

Book page house
Book page house

Untitled
Paper tubes made from origami paper and bobby pins

Untitled
Circles and triangles, and recycled maps.

Untitled

It’s these last two photos that hint at the latest technique I’m going to obsessed with. It’s exciting to discover EVEN MORE things to create from paper.

Work-In-Progress Paper Cut

Last week I mentioned beginning work on larger paper cut work, and this is the second of the two. The paper size is approximately 19″ x 24″ and is a thinner stock than the grey paper I was working with last week to create the flower shaped paper cut.

I’m enjoying working with the basic crescent shape and having the design flow around the page. Sometimes they become tornados, then seashells, and morph into imaginary microscopic organisms.

When I’d cut away about a quarter of the paper I came close to calling it quits because it seemed like an impossible amount of surface area to work with. I was overwhelmed because I don’t normally work this large. I’ve managed to push past that phase and will obsessively cut away paper until I reach the end.

Obsessed with Cutting Paper

The paper cutting obsession, which started with the Sketchbook Project, continues on. Tiny pieces of cut paper and worn out blades are starting to pile up around here, but I’m learning much in the process. These are three of the most recent ones I’ve made using a pack of coloured paper picked up at Yoko Yaya.

Paper Cutting

I like the process of making these designs because it’s loose, flowing and spontaneous. I grab a piece of paper, decide upon a single shape as a starting point for the design, and then start cutting. I try not to over think things and just let the design flow across the page. It’s a wonderfully meditative process.

Paper Cutting

Paper Cutting

All three of the paper cuts featured here are 5″x7″, and took between one to two hours to create. I want to go larger with these and also play around with layering a few of them together within a frame.

Flowers Made From Paper

A few weeks ago I helped make paper flowers as decorations for a friend’s wedding. It was something I’d wanted to try after flipping through a copy of Martha Stewart’s Encyclopedia of Crafts at a bookstore. The initial flower making session with friends led me to working on an installation of paper flowers in my apartment to share during the Eastside Culture Crawl.

The flowers are made from colourful tissue paper and masking tape, with cloth covered wire as the stems. They’re a mix of torture and enjoyment to make because it’s not easy wrapping thin paper around a tiny wire and ending up with it in the resemblance of a flower.

At the moment I have less than thirty flowers completed, and hope to make twice that many. I’m really hoping this installation idea is going to look as magical in person as it does in my head. It’ll definitely give visitors a pleasant blast of colour when they stop by during the Culture Crawl.

And if you’re wondering, all the flowers will be available for purchase – in case you want to take the magic home with you.