Work In Progress: Cutting At Six Times Regular Speed

Every once in awhile I take the time to shoot a hyperlapse of something I am working on. I’ve done this with paper cutting before, as well as drawing and stitching. The latest video I shared last week seemed to connect with a lot more people than usual and it went viral on Instagram, garnering over 24,000 views! I’ve never had that happen before, but it tells me people are much more interested in videos than they used to be on IG.

Untitled

I’ve since finished the paper cut design, but above is a photo of the work in progress. I took a break from paper cutting for awhile after completing the seven foot tyvek piece because I felt burnt out on it after that. I’m back to enjoying it again, and I’m happy to move on to creating new work.

Below is the video shot with Hyperlapse, which demonstrates my cutting process at six times the speed.

A video posted by Paper artist (@rachael_ashe) on

Flight Path / Taking Flight at City Atrium Gallery

Flight Path / Taking Flight is a site specific paper installation I created for a show at the Gladstone Hotel in 2014 (view photos of it here). I am pleased to finally get the opportunity to display it in a local venue at City Atrium gallery in North Vancouver. The full piece is made up of six hundred paper crow wings suspended from wire in clusters, but for this current version I’ve included about half of the original number.

Untitled

Untitled

The sculpture was inspired by my fascination with watching large flocks of crows moving across the evening sky in spring and fall in their daily commute home to their roost in Burnaby. It feels like a rare opportunity to see so many birds together in one place.

Untitled

Untitled

Flight Path / Taking Flight will be on display at City Atrium Gallery until January 9, 2017.

Dates: October 17, 2016 to January 9, 2017
Times: Mon – Fri 8:30am – 5:00pm
Location: North Vancouver City Hall, 141 West 14th Street

French Knot Embroidery in Paper

My experiments in making french knots on paper the other week led to working on a larger and more elaborate piece that I finished in the studio on Monday. I took many photos of my progress as I worked. The consistency of my French knots has seen a huge improvement from those first tentative test pieces.

French knots on paper

French knots on paper

I used pale grey embroidery thread on 90lb 11″ x 14″ Strathmore mixed media paper. I drew lines and concentric circles on the back to guide me and made up the design as I went along.

French knots on paper

I pre-punched the holes with the needle before adding the stitches, as you can see in the photo below.

French knots on paper

French knots on paper

The finished piece is lovely and seems to come across as a mandala, which was not intentional. This is one of a few experimental embroidery pieces I will frame and show during the Eastside Culture Crawl in November.

Magnificent Sonobe Origami Artwork for the Office

The sonobe origami art commission I’ve been working on for months is finished and hanging in the offices of Steamclock Software. It was custom framed and mounted at Frame of Mind Fine Art & Framing, which is the best place to go when you have weird or awkward pieces of art (like this is) that need framing.

The work brightens up our meeting room/kitchen and also acts as an acoustic panel to dampen noise in an echoey space.

Sonobe origami office art

Sonobe origami office art

The finished piece is 45 inches by 43 inches mounted on foam core, and is made up of 450 to 500 pieces of origami paper. I’m pleased this commission turned out so magnificently well.

Work In Progress: Embroidery on Paper Tests

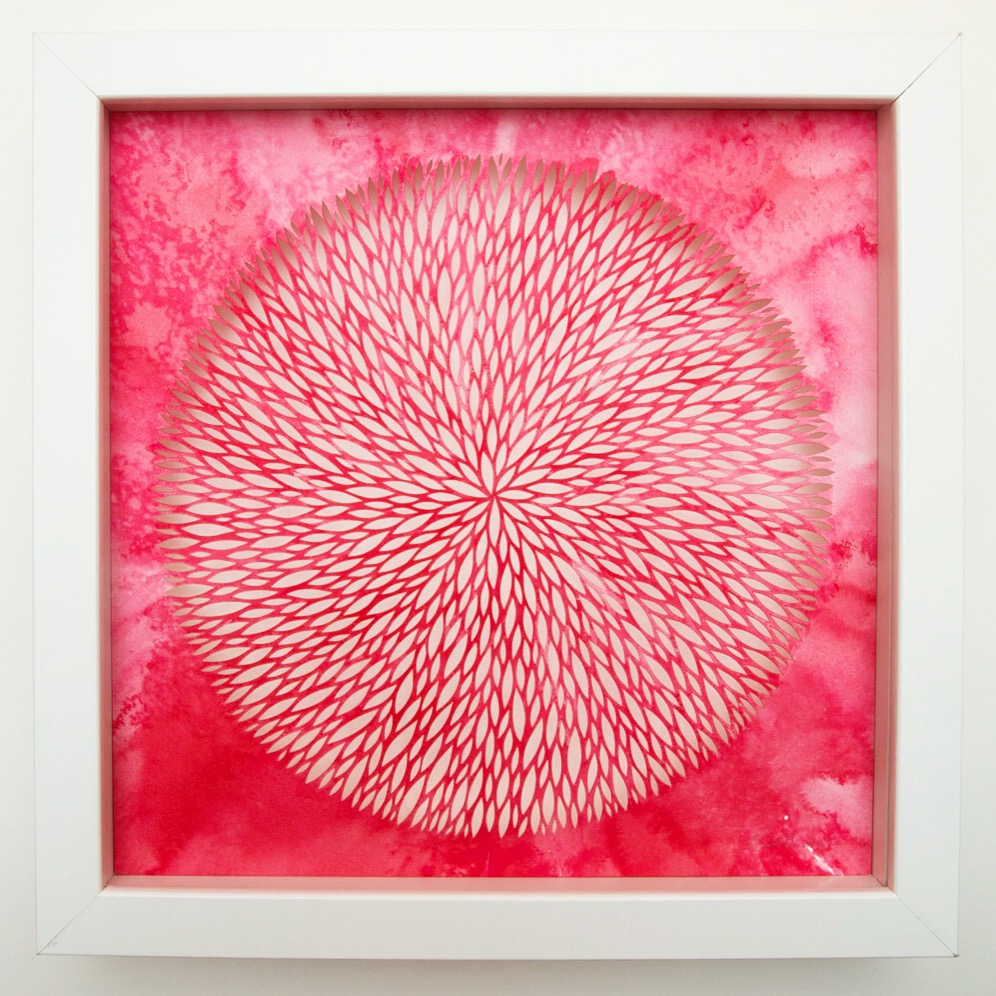
I recently made the transition from stitching on cloth to paper, which was bound to happen sooner or later because I am a paper artist after all. I started with a small scrap piece of paper and made a circle of French knots in red thread. I added the paper cut design after the embroidery to see how those would work together.

If I combine stitching and paper cutting again I’ll have to do the cutting first because the textured knots make it so the paper can’t lie flat, and that makes things awkward. I made it work because the paper was small and it was a test.

French knots on paper

With my second test piece I worked with heavier card stock and did a more intricate design that I made up as I went along. I drew lines and circles on the back to guide me, and punched the holes with the needle before I did the stitching.

French knots on paper

With my third test piece I pulled out a line drawing from last year and decided to add French knots to create texture, and see how the two mediums work together. Despite the busy nature of the drawing the French knots look terrific on the piece (more so than what comes across in this photo).

French knots on paper

The three pieces have been great practice in getting a feel for handling paper carefully while trying to stitch, and I’ve gotten so much better at creating nice even French knots. I could make them all day. It the same way I feel about the other mediums and techniques I love.

Behind the Scenes While I Work

Last week I did a quick paper cut piece as both a warm up and a painting experiment using acrylic ink. I shot two time lapse videos with my iPhone during the cutting process, and then during the painting process and shared these on Instagram. It’s a great way to step back from my own process and see it from an outside perspective.

A video posted by Paper artist (@rachael_ashe) on


I especially love the painting video because it makes me seem better at applying paint than I actually am. I paint very little so I was nervous about sharing this part of the process.

A video posted by Paper artist (@rachael_ashe) on


The finished piece is 9″ x 9″, hand cut from white paper painted with red acrylic ink.

New Iteration of the Flowerburst Installation

Hammer Cut Stitch Repeat opened yesterday evening at Circle Craft gallery, and one of the pieces included in the show is my Flowerburst installation. This is the third time I’ve shown the piece, and every time I present a new iteration. You can see previous versions at Mary E. Black gallery in Halifax, and at Hot Art Wet City.

Untitled

The original work was blue and last year I started making yellow and red ones to expand the work further. When I started putting things together for this installation I decided to incorporate some of the red pieces, and chose white foam core as the base instead of black. The photo below is a small part of the installation at Circle Craft gallery with one of the paper wearables positioned beside it. I love how these two works tie into one another in terms of colour and technique.

Untitled

It was a really terrific opening night for the show with many friendly faces in attendance, and plenty of enthusiasm for the work. The show continues until October 11th, so there is plenty of time still to see.

Work In Progress: Re-Working an old paper cut piece

I think I initially created this piece of work two years ago, and I’ve never been completely satisfied with it. I made it with two separate cut layers, and it didn’t quite work. I decided it was time to take it apart and do something more to it. I drew a third concentric circle (that my compass was almost not large enough to handle) and started cutting it more. You can see the original version of this on Flickr, photographed with the layers flat.

Work in progress

I always photograph pieces as I go along because it helps me realize how quickly I can work. I pushed myself at the end of last week to make it to the half-way point with the third circle.

Work in progress 2

Work in progress 3

Today I pushed myself to finish off the remaining second half, and I managed to do it. Pictured here is the point I reached just before taking a lunch break. It feels good to have made this piece larger. I think it makes it stronger than the original layered version.

I took a short Hyperlapse video of me working on this towards the end. It’s another interesting way to record and reflect on my process and progress.

A video posted by Paper artist (@rachael_ashe) on

Wearable Art, Red Blooms

This piece was the first of the wearable art work I began in the spring, and it ended up getting finished last because I got caught up in making the other two pieces. For a long time I was stuck on how to create a base or attach the flowers together in a way that would flow around the wearers neck. I made a few different mock ups of potential bases before eventually settling on a curved collar piece.

The base is made from white mixed media paper and then covered in a beautiful lacy Japanese paper I’ve had stashed away for years. It was a material I bought on impulse years ago, and really had no use for in the work I made usually. I attached the flowers using Yamato Sticking Paste, which is another material I bought ages ago on impulse and have never used. It was the perfect adhesive for this project because it dried fast and clear.

Wearable Art, Red Blooms

Wearable Art, Red Blooms

The last thing I need to do for this show is a photo shoot with friends or with myself as the model to showcase the wearable pieces on people. They look even better when worn.

Photographing Recent Work

In preparation for Hammer Cut Stitch Repeat in September I’ve been photographing work for the show. I have a deadline at the end of this week where photos are due, and it’s been a good excuse to get a few things documented.

I love this detail photo of me behind a close-up of one of my cut tyvek scroll installation pieces, taken by my friend Ryan Mah. I needed help photographing these large pieces, and he really came through. Now I can add both to my portfolio, which is long overdue as a to do.