Meditating in Paper

I shared the backlit rear view of this piece at the end of last week, and now here is the front. I’ve been making variations of this style of work a few times over the last few years, but this is the most perfect and largest version to date.

Meditation

The first photo above was taken while the work was still in-progress, and the last photo in this post is the completed version. You can see refinement in the completed shape because I was working towards a circle, which is about 13 inches in diameter.

Meditation-3

Meditation-5

Meditation-4

I think of creating these pieces as an act of meditation, but there is something about looking at one that is meditative for the viewer. Even though I’ve made pieces like this several times I think there is more to explore, so I know I’ll be making more in the future.

When the Back is More Interesting Than The Front

Yesterday I was about to start framing up a finished 3D paper cut piece, but needed to document it beforehand. I took this photo of the back of the piece with my desk lamp shining through the middle. It has a dramatic effect on the appearance of this piece, and makes the pattern even more mesmerizing.

Untitled

One of the things I keep thinking about and would love to explore this year is creating paper cut light boxes. I know just the person to collaborate on this with (but have yet to reach out…)

I’ll share the front of this finished piece next week. It’s sitting in my dining room looking pretty wonderful at the moment.

Wave Paper Cut Commission

This is a small commission I completed for a client a couple of weeks ago and was waiting to share it until after it was given (and received) as a gift.

The requirements were for the paper to be cerulean blue, for the work be to made into a card that could be framed later, and for the design to be ocean-themed. It also needed to be turned around on short notice so I used an existing design I’d created for a previous commission.

Wave commission

Wave commission

Wave commission

I like this wave design enough to now consider creating it as a paper cut “print” for my Etsy shop. What do you think?

Completed Cut Paper Scroll

I finished the epically long tyvek paper cut piece a few weeks back and forgot to share it here on the blog. Considering how long this thing is (7 feet by 18 inches) it didn’t take me much time at all to complete. When I started I thought cutting it would consume the entire month of January, but I was done in about two weeks.

Finished tyvek installation

Finished Tyvek Installation

I need to take a proper photo of this work but it’s tricky to fit it all in the frame. My next step is figuring out how this will hang because I want space between it and the wall so it casts beautiful shadows.

Ten Cut Paper Cubes

Remember those cut paper cubes I made for Voice From Another Room at Hot Art Wet City last year? I’ve always been meaning to return to them and make more. I had six at the time, but one sold, so I decided to make five more for an installation of an even ten.

Untitled

Here are three of them freshly cut and waiting to be scored, folded, and glued together.

Ten cut paper cubes

Ten cut paper cubes

I love the ten of them together, and the wonderful shadows they cast. Now I need to figure out exactly how I want to arrange and have them displayed for my upcoming show in Halifax. More details to follow on this. I’m just waiting final confirmation on the show title.

Work In Progress Cut Paper Scroll

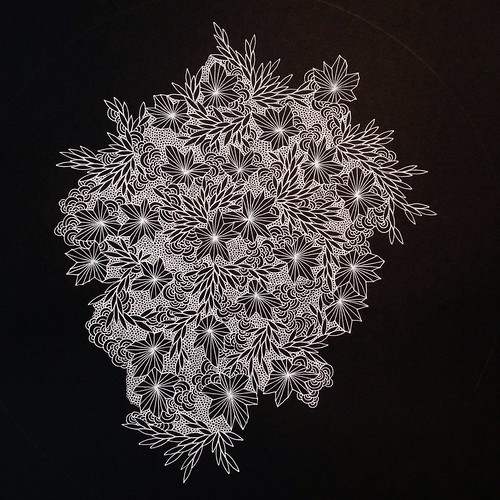
This is one of those ideas I’ve had on my mind for a few years and only now have I found the opportunity to work on. I want to make large paper cut work but I’ve held back because of the logistics of how to do it when the project is larger than both my work surface and my studio. The paper I work on when I cut is in constant motion and rotation, and when the paper is large I’m not sure how to do this without damage.

With this project I decided to use the roll of tyvek left over from an installation I made a few years ago. I’d started cutting a design into the roll early last year and never went back to it because I didn’t have a good plan. But this time I decided to cut the width of the tyvek in half but keep the length, and also roughly plan out the design.

Untitled

Untitled

I’ve divided the tyvek into five sections and sketched out rough guidelines on each one. I’m using triangles rather than my favourite crescent shape because it lends itself better to working large. This is the progress I made on the project so far, which is about three of the seven feet.

Untitled

Untitled

I had Boris take a photo of me holding up the roll to demonstrate the size of this work. I’m enjoying working on this thing because I like the challenge. Progress is going much faster than I’d thought it would, which is terrific because I have many other things to work on once this is complete.

Untitled

2014: A Year End Review in Twelve Photos

I enjoy looking back through the year end review blog posts from previous years because it reminds me of things I’d forgotten about. I think all of the posts are filled with photos of nature and artwork, and this year is no exception.

Heart paper cut work
January

Hearting the Neighbourhood
February

Toronto graffiti & street art
March

Spring in Vancouver
April

May long weekend on Bowen Island
May

Kirigami paper cuts
June

Work in progress paper cut design
July

Untitled
August

Work in progress paper cut - detail
September

Work in progress - Moon
October

Anna's Hummingbird
November

TerraSkin paper - Circle series
December

May 2015 be a good one for us all!

Exploring TerraSkin Paper And Circles Part 2

Part two is for sharing the remaining three TerraSkin paper cuts exploring circles. Part one can be found here.

The series of six explores circles in new ways for me, as well as allowed me to work with TerraSkin paper more extensively. It feels slippery and light but is super easy to cut because there is no resistance to the knife. Each piece is 9″ x 11″, and each circle is about 7.25″ in diameter.

TerraSkin paper - Cricle series

TerraSkin paper - Cricle series-2

TerraSkin paper - Cricle series

TerraSkin paper - Cricle series

TerraSkin paper - Cricle series-3

TerraSkin paper - Cricle series-4

I backed these in black for the purposes of the photos but these will actually be displayed without a backing paper and unframed.

This work will be on display as part of Toronto Design Offsite Festival in January 2015 along with other designers and artists as a window display called, Vancouver Outside The Box. More details available on the website.

Exploring TerraSkin Paper and Circles

I’m going to share this small series of paper cuts in two parts because it feels like too many images for a single blog post. I shared in November about creating a paper cut using TerraSkin paper, which is made from stone rather than plant fibres. Over the last week and a half I created five more to meet a deadline for an upcoming exhibition.

The series of six explores circles in new ways for me, as well as allowed me to work with TerraSkin paper more extensively. It feels slippery and light but is super easy to cut because there is no resistance to the knife. Each piece is 9″ x 11″, and each circle is about 7.25″ in diameter.

TerraSkin paper - Cricle series-6

TerraSkin paper - Cricle series-7

TerraSkin paper - Cricle series-4

TerraSkin paper - Cricle series-5

TerraSkin paper - Cricle series-2

TerraSkin paper - Cricle series-3

I backed these in black for the purposes of the photos but these will actually be displayed without a backing paper and unframed.

This work will be on display as part of Toronto Design Offsite Festival in January 2015 along with other designers and artists as a window display called, Vancouver Outside The Box. More details available on the website.