Paper Cut Work: Wisps

I’ve been busy working on exhibition proposals for possible shows in the next two years, and it’s been a great excuse to project farther into the future with my work. I really want the paper cut work to be three dimensional and my initial explorations led me to the structural/sculptural pieces I shared last month. But I also started thinking about ways to play with layers, and shadows within framed work.

Here’s what I’ve come up with so far:

untitled
Wisps, 2013 – 12″ x 12″ cut paper in cradle panel

Using the inside of a wood cradle panel as my frame, I sanded and painted it with a light wash of white. I cut the three strips that make up this piece separately from the one piece of paper and all are attached by a tab of paper at the top and bottom. The middle piece is slightly deeper in the frame than the others.

Paper Cut Work- Wisps

Paper Cut Work- Wisps-3

These are just some quick photos so the lighting isn’t quite right, but this way of integrating the paper cuts into the frame creates more depth. This is important to me because I wanted room for the paper cut pieces to cast interesting shadows, which will vary depending on the lighting.

Paper Cut Work- Wisps-2

With each new exploration I feel like I’m getting closer to where I want to be with the paper cutting work.
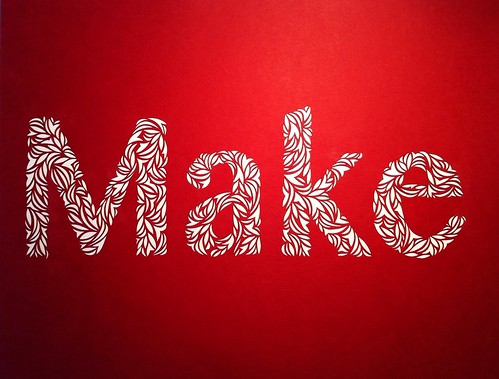
Make: Cut Paper Typography

After my initial explorations into cut paper typography with the word Art a few weeks ago I decided to choose a few more words to work with. Make goes very well with Art, and after today Create will be added to the series.

Make

Make

To give you a sense of scale this is an 8.5″ x 11″ piece of red card stock, and the letters are between 2.25″ to 3″ high. I create the word in photoshop first, print it out and use this as a template to draw an outline of the letters. All the cutting of shapes is done freehand.

Make

Make

I enjoy trying to form the letters from smaller shapes. It’s actually pretty challenging because I am working so small. I think it’s an excellent exercise to refine my paper cutting technique even further.

Make

Make

Other than the word “Create” can you suggest other short words that would make a good addition to this series? I’m open to requests.

The Kokeshi Project

This lovely little kokeshi doll is my contribution to an upcoming fundraising event at the Nikkei Museum. This is my first time contributing work to their annual BLOOM art auction, an event that supports the exhibitions, educational and cultural programs at the museum.

There are about 100 artists contributing work, and each was provided with a basic wooden kokeshi doll they could customize however they liked. I am very curious to see all of these dolls together on the night of the event.

Kokeshi doll

Kokeshi doll-2

My doll is eight inches high (we had a few sizes to choose from) and I have decorated her head to toe in cut paper. Her face is cut from white paper, and her clothing and head dress are cut from red paper.

Kokeshi doll-4

Kokeshi doll-5

The dress is one piece of paper, while her head is decorated with multiple pieces of cut paper. This was actually her first outfit which I cut to pieces and used a different way because I wasn’t happy with how it turned out (because I’m picky).

Kokeshi doll-6

Kokeshi doll-7

If you’re interested in purchasing one of the dolls the silent auction is happening on Thursday, April 25th, from 7pm to 9:30pm. Tickets are $25 to attend and can be purchased in advance online using paypal.

Cut Paper Typography

I’ve long admired the work of Elsa Mora, a Cuban artist living in LA who works in various mediums including paper cutting. I was looking at her website earlier this week as a way to jog my thinking on how to write about my own paper cut work, and came across her new site, Art Is A Way.

Paper cut typography

It’s a lovely little side project of creating artwork using the word Art, and she’s invited people to join her. I don’t normally have much interest in exploring typography in my own work, but the project inspired me to experiment with typography created in my style of cut paper.

Paper cut typography-4

Paper cut typography-3

I chose a font in photoshop, Tamil NM in bold, made it large enough to nicely fill an 8.5″ x 11″ page and printed it out. I used this as a template to trace the outline of the letters first and then freehand cut all shapes. It was really fun to do, and has me pondering more potential work using type.

Paper cut typography-2

Paper cut typography

If you’re interested in creating your own work of the word Art, check out the about page of Art Is A Way for details.

Cut Paper and Structural Explorations Continue

I realize as I work on these structural paper cut pieces that I am exploring two very different things and trying to make them work together. It’s one thing to make a paper cut design that will be displayed as flat and in a frame, and quite another to translate it into a free-standing sculpture. I’m also trying to work out how to make interesting structures from paper that can support themselves when most of the material has been removed.

With this latest piece I was trying to take a slightly different approach than the previous work I finished last week, but I ended up creating the same structure, just with a different paper cut design.

Cloud structure-5

Cloud structure-4

The variation I attempted with this was to score the bottom and sides to create folds in the paper. I don’t quite have enough understanding about how to do this, so my folds didn’t work the way I thought they should. I was also going to taper the structure at the top and attach it together but threw that idea out the window as well.

Cloud structure-3

Cloud structure-2

I want to play around with structural explorations on their own without doing all the work of cutting paper, just to properly educate myself. But the paper cutting makes a big difference to the integrity of the piece, how it holds together, and its ability to stand.

Cloud structure

Just in case you’re wondering, the finished size for this one is 8″ high, 6″ wide, and 3″ long. I hope I can eventually make something even larger.

The Box As Cut Paper

Last week was mostly spent on administrative tasks but at the end of the week I fit in time to work on another cut paper sculpture.

I kept the form simple and made a basic cube with two of the sides left long. I’d had in mind to have these two long flaps eventually connect together but things went in a different direction as I worked.

Untitled

I chose a leaf as the repeating shape and cut away most of the paper on four sides, leaving the bottom uncut. I decided to contour the top and sides of the box by cutting away the straight edges of the paper. It makes the whole thing seem even more delicate.

Untitled

Untitled

I left a thin border of paper around the sides and attached these together with glue. The finished size is about 5.5″ tall, 4″ wide, and 4″ long.

Untitled

I’m really pleased with this prototype. I actually feel ready to move onto creating finished work.

Structural Paper Cutting

After I finished the paper cut pyramid last week I began to work on a second piece with a different approach to making something three dimensional. Instead of creating the structure from a single sheet I used scraps of paper cut into triangles of different sizes, two as sides, and one as a bottom piece. I wanted to cut the design first and then attach the paper together afterwards.

Untitled

I spent a lot of time cutting paper and not so much on determining the structure, but I wanted to see how well pieces of paper can support themselves when most of the material is cut away. It sags of course, especially on the sides that are unattached. I would need to include more structural support if translated into a larger scale.

Untitled

It’s a lovely piece, and I think the shadows are an integral part of it.

For the next prototype I will do less with paper cutting and focus more on structure just to see where this will take me. Stay tuned.

Trying to Project Into the Future

My paper cutting demo at Opus went very well on the weekend. The people who attended were very interested, and most seemed to get a lot out of it. I wasn’t sure how well I could share how I do this work, but I did just fine thanks to careful preparation.

It was inspiring to me to talk about this work, and was just the thing I needed to get back producing in the studio again. I’m trying to think ahead to possible upcoming shows which could happen up to two years from now (if my proposal is accepted). I’ve never worked this way before and I’m unsure how to project so far ahead because my work is constantly evolving in ways I don’t foresee.

Work in progress paper cutting construction. Very rough at the moment. Exploring ideas for new work.

Rather than getting bogged down with this I decided to experiment and build further on the paper cutting work I’ve been doing. I was intrigued with the idea of creating something three-dimensional. I chose to create a pyramid-like box and cut three of the sides with the usual intertwining crescent shapes. I wanted to see how this would work, and not focus too much on specific details.

The finished prototype of the work in progress I shared earlier today. Working through some ideas.

The finished prototype is rough and imperfect, but a really good starting point for figuring out more three dimensional pieces. It plays wonderfully with direct light too. I’m trying to imagine it larger, but it makes my hand sore just thinking about it.

Paper Cut Work: Radiating Outwards

My first forays back into the studio have found me feeling uninspired and stuck. I know the best way around this is to just sit down, get to work, and focus on getting my hands moving rather than on the results. This often works very well with me because I am a process driven artist and I created in a spontaneous manner anyway.

I grabbed my knife and a piece of paper, made some quick decisions about what I wanted to do, and then began cutting.

Untitled

I’ve used this leaf shape many times before, but this time I wanted to work smaller and closer together, and end up with an overall form that wasn’t round. Working in a radial naturally lends itself a circular form but I wanted to see how it could work in a more squared composition.

This one vibrates. Work in progress paper cut.

I cut the design until it was about eight inches in diameter and then began working it into a square. It looked beautiful at that point but I decided to keep pursuing the idea. It went through a phase where I thought I’d ruined it but pushed on and came through to the end where I’ve achieved the squarish form (I was never going for a perfect square).

I don’t think I will work this small as a general rule, even though it was interesting to try it out, because it doesn’t read well overall.

5c1b50f9-b0c3-413c-9824-3d6e114c70ea

Even though this took many hours and xacto blades to create, I consider it a sketch resulting from an exercise and not finished work. It did the trick though, because I find myself INSPIRED!